Loading...
Loading...
Loading...
Loading...
Loading...
Loading...
Loading...
Loading...
Loading...
Loading...
Loading...
Loading...
Loading...
Loading...
Loading...
Loading...
Loading...
Loading...
Loading...
Loading...
Loading...
Loading...
Loading...
Loading...
Loading...
Loading...
Loading...
Loading...
Loading...
Loading...
Loading...
Loading...
Loading...
Loading...
Loading...
Loading...
Loading...
Loading...
Loading...
Loading...
Loading...
Loading...
Loading...
Loading...
Loading...
Loading...
Loading...
Loading...
Loading...
Loading...
Loading...
Loading...
Loading...
Loading...
Loading...
Loading...
Loading...
Loading...
Loading...
Loading...
Loading...
Loading...
Loading...
Loading...
Loading...
Loading...
Loading...
Loading...
Loading...
Loading...
Loading...
Loading...
Loading...
Loading...
Loading...
Loading...
Loading...
Loading...
Loading...
Loading...
Loading...
Loading...
Loading...
Loading...
Loading...
Loading...
Loading...
Loading...
Loading...
Loading...
Loading...
Loading...
Loading...
Loading...
Loading...
Loading...
Loading...
Loading...
Loading...
Loading...
Please browse our comprehensive self-service support articles below. If you're in need of direct help please don't hesitate to reach out to our team directly:
For email support: [email protected]
For live chat support use the chat popup in the bottom-right corner of your screen.
For community support head to our discord at https://discord.gg/backpack
Download official Backpack apps for Exchange and Wallet across your devices.
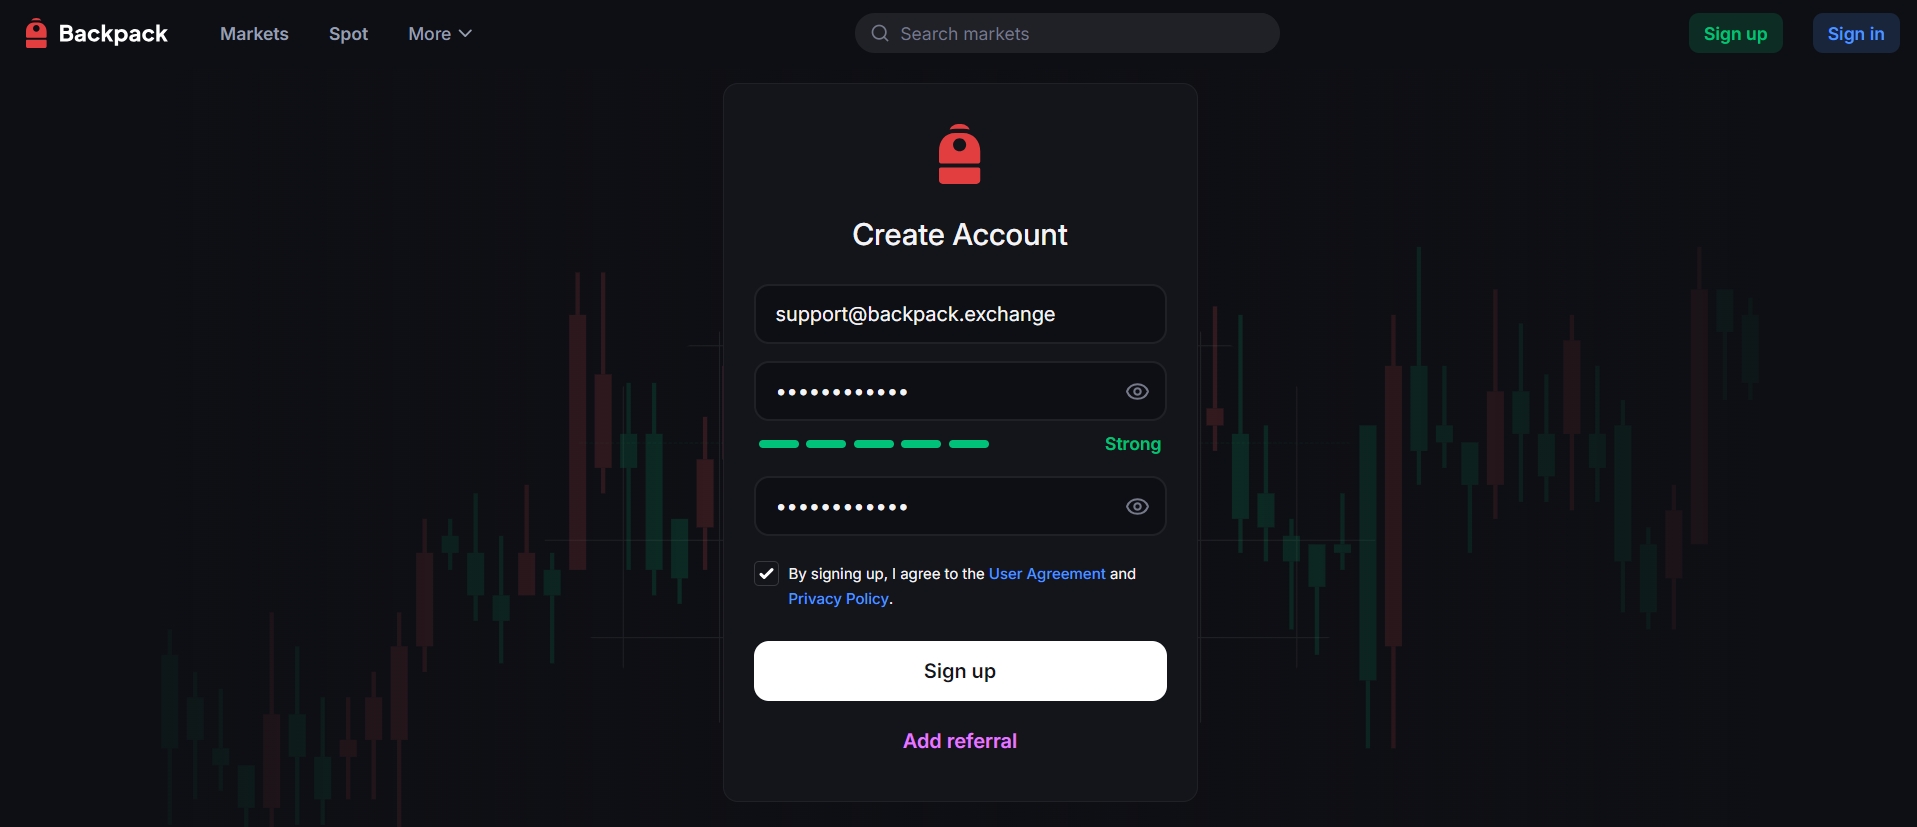
To get started, visit Backpack Exchange and select 'Sign Up'.
Note: Ensure that you're on the official Backpack Exchange domain
Note: You will need access to this account later in the registration process.
Note: The password must be a combination of numbers and letters. It should contain 9-20 characters, at least one number, and one upper case.
KYC (Know Your Customer) is a standard process required by global financial regulations. It serves several important purposes:
Compliance With Regulations KYC ensures that the exchange complies with international Anti-Money Laundering (AML) and Counter-Terrorist Financing (CTF) requirements. This helps prevent illegal activities such as money laundering, terrorist financing, and fraud.
User Identity Verification By verifying the identity of each user, the exchange can confirm that accounts are genuine and are not created with stolen or falsified information.
Account and Asset Security Verified accounts significantly reduce the risk of unauthorized access, identity theft, and fraudulent transactions. This helps protect both users and the platform.
Improved Service Access Completing KYC often provides users with higher transaction and withdrawal limits, as well as access to more advanced features and services.
Crypto deposits and withdrawals on Backpack Exchange are processed directly on-chain.
Withdrawals: transfer assets from your Backpack Exchange account to an external blockchain address of your choice.
Deposits: bring assets from an external wallet into your Backpack Exchange account.
You can always check the minimum deposit and withdrawal amounts for each supported asset on the Market Info Assets page. This helps prevent failed transactions caused by sending amounts below the required threshold.
⏳ Note on confirmations: Deposits require a certain number of blockchain confirmations before they appear in your account.
For the minimum deposit and withdrawal amounts and withdrawal fees for different tokens, please refer to https://backpack.exchange/market-info/assets.
The most common fixes for OTP (One Time Pass) code issues:
Look for OTP code in your 2FA app (not email).
Sync your 2FA app device and Exchange login device to the same timezones.
Do you have multiple 2FA apps downloaded? Make sure you're checking in the correct one.
If you cannot resolve OTP issues after verifying the above solutions please reach out to Support via [email protected]


🔐 Enabling 2FA is one of the most effective ways to keep your account and funds safe. We strongly recommend activating 2FA immediately after registration.
Log into your exchange account, click the Settings button in the top right corner, and select Security.
Under the 2FA section, click Enable, then enter the one-time passcode (OTP) sent to your registered email and click Submit.
Scan the QR code with an authenticator app (e.g., Google Authenticator), then enter the Verification Code in the field below and click Verify.
🎉Setup complete!
Ensure network connectivity.
Please make sure your internet connection is stable.
In some regions, a global VPN may be required.
Check your spam or junk folder.
Then add the verification email address [email protected] to your whitelist and try again.
Check if you are using a decentralized email (e.g., Dmail).
Due to differences in architecture and protocols, such email services may sometimes be misclassified or incompatible with certain platforms’ mail systems.
If this is the case, we recommend following these steps to
If you cannot resolve OTP issues after verifying the above solutions please reach out to Support via [email protected]
Convert Dust helps you clean up your account, optimize fund usage, and manage your assets more efficiently.
“Dust” refers to very small balances of cryptocurrencies left in your account after trading, fee deductions, or airdrops. These small amounts are usually too small to be traded or withdrawn individually.
To reset your 2FA, please follow the steps below and submit the required information to [email protected].
⚠️Please note: 2FA reset typically takes around 48 hours to complete.
Send an email to Customer Support
In the subject line, enter “2FA Reset”, “2FA Recovery”, or similar.
Our fiat solution enables you to deposit and withdraw USD via SWIFT wire transfers directly to and from your personal bank account, providing seamless global fiat access (subject to jurisdictional restrictions).
Due to regulatory requirements, our fiat services are not available in certain jurisdictions. Please refer to the list below for countries and regions where fiat deposits and withdrawals are currently not supported:
A Conditional Order is an instruction to buy or sell an asset once certain market conditions are met, such as reaching a specific trigger price. When the trigger condition is activated, the order is placed automatically as a market or limit order.
When you want to automate entries or exits based on price movement.
At Backpack Exchange, our commitment to providing a transparent and competitive fee structure is paramount.
The table below outlines the Spot Trading & Perpetual Futures fee tiers, enabling traders to easily identify the fees associated with their trading volume.
We may change these fees for the next phase of launch and will post the updated fees here beforehand.
*SUBJECT TO CHANGE*
The Travel Rule is a global regulatory requirement issued by the Financial Action Task Force (FATF). It requires Virtual Asset Service Providers (VASPs), such as cryptocurrency exchanges, to share sender and recipient information when transferring digital assets above a certain threshold. This helps prevent money laundering, terrorist financing, and other illicit activities.
Why Does the Exchange Ask for Additional Information When I Withdraw?
Depending on the withdrawal amount and the destination, you may be asked to provide beneficiary details such as the recipient’s name or account reference. This information is required for Travel Rule compliance and ensures the security and transparency of crypto transfers.
Is My Personal Information Safe Under the Travel Rule?
A Scaled Order is a trading strategy that places multiple buy or sell orders at predefined price intervals, either above or below the current market price. This creates a series of smaller orders that scale into or out of a position gradually, rather than executing a single large order.
When you want to average your entry or exit price over a range instead of committing at one price point.
Belarus
Central African Republic
Crimea / Sevastopol Region / Luhansk / Donetsk / Kherson / Zaporizhzhia / Dnipropetrovsk Oblast / Kharkiv Oblast
Cuba
Democratic People’s Republic of Korea (North Korea)
Democratic Republic of the Congo
Gaza
Iran
Libya
Myanmar (Burma)
Nicaragua
Russian Federation
South Sudan
Syria
United States
UAE
Venezuela
Zimbabwe
Individual accounts must use personal bank accounts only. For business accounts, onboarding as a corporate client is required. Contact support for assistance.
Yes, but only if:
The account is in your name
The platform supports named SWIFT USD transfers
The transfer isn't from a pooled or anonymous account
Note: These platforms may reject transactions based on their own policies.
To comply with regulatory and banking partner requirements, you may be asked to provide extra information such as:
Proof of source of funds (e.g., recent bank statement)
Purpose of transaction (e.g., “crypto trading”)
Any other compliance-related documents
Please respond promptly to avoid processing delays.
Visit the Backpack Exchange login page.
If you can’t remember your password, click the “Forgot Password” link.
Click on “Forgot Password”
After clicking the link, you’ll be directed to a new page.
Enter Your Email Address
On the reset password page, enter the email address associated with your Backpack Exchange account.
Click the “Next” button.
Check Your Email
You’ll receive an email from Backpack Exchange with a reset link.
Open the email and click “Reset Password.”
Follow the Prompts
After clicking the link, you’ll be taken to a page to set a new password.
Choose a strong password that you haven’t used before.
Access Your Account
Return to the Backpack Exchange login page.
Sign in with your email and new password.
🎉 And that’s it! You’ve successfully reset your password and can now continue using Backpack Exchange.
💡 Tip: Keep your password safe and consider using a password manager for secure storage.
To protect against losses (e.g., stop-loss) or lock in profits (e.g., take-profit).
When you cannot monitor the market continuously but want orders to be placed automatically at key levels.
Provides flexibility by combining trigger conditions with order execution.
Can be set as a stop-market or stop-limit order after the condition is met.
Execution is not guaranteed if the market does not reach the trigger price, or if there is insufficient liquidity at the chosen limit price.
Commonly used for risk management and strategic trading automation.
Suitable for traders who expect gradual market movements or who want to reduce the impact of volatility and slippage.
Often used to ladder into positions during uncertain market conditions or to ladder out when taking profits.
Helps reduce the risk of poor timing by spreading orders across different price levels.
Can be configured with the number of orders, price range, and distribution (equal or weighted).
Execution depends on market movements — some or all orders may remain unfilled if the price does not reach those levels.
Useful for both long-term accumulation strategies and short-term trading in volatile markets.


Backpack Exchange extends services to regions and countries across the globe.
We currently do not serve residents of the following countries and regions:
North Korea
Iran
Cuba
Crimea Region of Ukraine
Sevastopol Region of Ukraine
Luhansk Region of Ukraine
Donetsk Region of Ukraine
Residents from these areas will not have access to the services provided by Backpack Exchange.
If you reside in any of the countries or regions listed below, we are not currently able to serve you, but we are working towards being able to do so in the future:
Canada
Japan
New Zealand
Note: Supported regions and countries are subject to change.
A common reason for this situation is how candlestick (K-line) charts are constructed versus how individual trades are executed and displayed.
Candlestick Aggregation
Each candlestick (K-line) represents the open, high, low, and close prices within a set time interval (e.g., 1 minute, 5 minutes).
If your trade occurred at a price between the recorded high and low, but it did not exactly match the open, close, or extreme values, it will not appear as a labeled point on the candlestick itself.
Trade Matching vs. Chart Data
The execution price of your order comes from the order book matching engine.
The candlestick chart is based on a stream of trades during each interval, but depending on chart compression and data aggregation, not every individual trade is visible.
Low Volume or Rapid Price Movements
If there was very little trading activity, your trade might have occurred at a price level not revisited by other trades within that candle.
Charts often display only the highest and lowest trade prices in the timeframe, so intermediate prices (including yours) may not be obvious.
Chart Provider Variations
Depending on the charting system or data feed, some platforms may round, filter, or slightly delay certain ticks.
This can cause differences between what you see on the chart and the precise execution record of your trade.
Your order was executed correctly at the market price available in the order book. However, because candlestick charts only show summarized price points (open, high, low, close) for each interval, not every individual execution price will be visible on the K-line. For exact trade prices, always refer to your order history or trade log rather than the chart.
Log into your exchange account and go to Portfolio. On the assets page, click “Convert Dust.”
In the pop-up window, click “Convert.”
Important: The reset request must be sent from the email address registered with your Backpack Exchange account.
If you do not receive a reply from Support within 48 hours, please send a follow-up email.
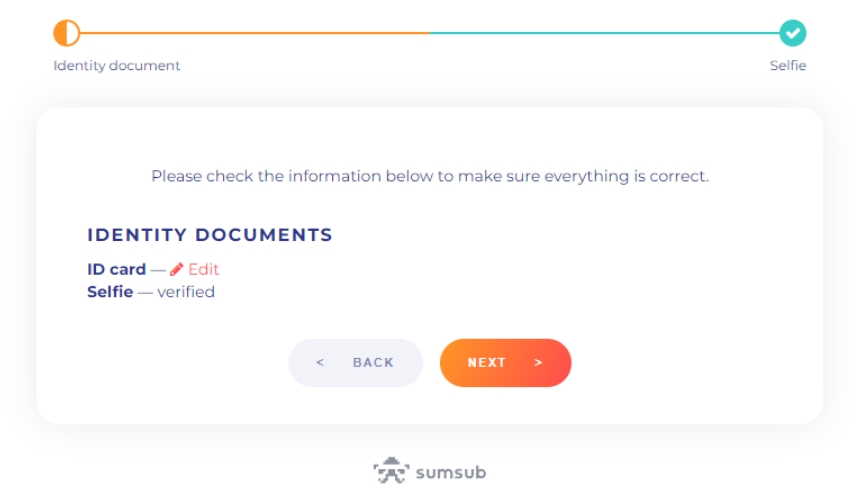
Complete Sumsub Verification
After receiving a reply from Support, you will be provided with a Sumsub verification link.
Access the link and complete the identity verification process.
Reply to the email and submit the required identity information
The information you need to provide includes, but is not limited to:
Name and Address Confirmation
Please provide your full legal name and current residential address associated with your Backpack Exchange account.
Source of Income
Please provide your primary source of income or occupation details for identity verification.
Transaction Details
Provide as much detail as possible about your account transactions, including (but not limited to):
Transaction dates
Asset names
Asset amounts
Processing
Once you have completed the Sumsub verification and submitted all required information, Customer Support will begin processing your 2FA reset.
Feature
Scaled Order
TWAP (Time-Weighted Average Price)
Execution Logic
Places multiple limit orders at predefined price intervals within a chosen price range.
Splits a large order into smaller market orders when executed evenly over a fixed time period.
Control Factor
Controlled by price levels.
Controlled by time.
Execution Guarantee
Execution not guaranteed – only orders at reached price levels will fill.
Full order is typically executed as long as liquidity exists.
Primary Objective
Cost averaging and laddered entry/exit across multiple price levels.
Minimize market impact and achieve an average price over time.
Execution is not guaranteed — the order will only be filled if the market reaches or exceeds your set price.
The logic of a limit order is:
A buy order will be executed at a price ≤ your set price.
A sell order will be executed at a price ≥ your set price.
If you do not enable the Post Only option, the system will match your order against existing orders in the order book immediately, as long as the price condition is satisfied.
To ensure your order is always placed into the order book as a Maker order, you need to check Post Only. Otherwise, your order may be executed immediately as a Taker order.
Example:
You set a buy limit order for BTC/USD at 30,000.
The current best ask price is 29,900.
Result: The system will execute the order immediately at 29,900 instead of placing it at 30,000 to wait.
Important Note on USDT/USDC Trading:
Our USDT/USDC trading pair is subject to a 0% fee, which means that trades on this pair do not count toward your 30-day volume requirements for fee tier upgrades.
Mad Lads holders who connect their Backpack Wallet containing the NFT to Backpack Exchange will automatically qualify for VIP Tier 1 trading fees. The Mad Lads VIP program is in place for both Spot and Perpetual futures.
Maker Fee: A "maker" is someone who places a limit order that adds liquidity to the market. This means the order isn’t filled immediately but waits for a matching order (opposite buy or sell) to come along. The fee incurred for such orders is called the "maker fee". Makers typically pay a lower fee as they contribute to the market's liquidity.
Taker Fee: A "taker" is someone who places an order that matches immediately with an existing order on the order book. This takes liquidity away from the market. The fee for such orders is called the "taker fee". Takers typically pay a slightly higher fee due to the immediate nature of their trades.
The more you trade, the more you save! Our fee structure is designed to reward high-volume traders with reduced fees. As your 30-day trading volume increases, you ascend through our tier levels, and your applicable fees decrease. Both maker and taker fees decrease as you move to a higher tier, allowing for a more cost-effective trading experience.
Please refer to the table provided to view the fee structure across different tiers and the corresponding 30-day volume requirements. We aim to offer a seamless trading experience with a clear understanding of the associated costs.
Note: Fee tiers are recalculated every hour, so your tier status is updated regularly.
The Address Book is a feature designed to make crypto withdrawals more secure and convenient. It allows you to save frequently used wallet addresses and manage them within your account.
Click “Portfolio.”
Under the “Settings” tab, click “Address Book.”
From the “Network” dropdown menu, select the corresponding network.
Click “Add Address.”
Fill in the required fields:
Set the label for the address.
Enter a brief description (optional).
Paste your frequently used withdrawal address.
Click “Continue” to save.
🎉 Done! Next time you make a withdrawal, you can quickly select this saved address directly from your Address Book.
Variable Interest Rates: Lending yields are not fixed and may fluctuate based on borrowing demand. Lower demand results in lower returns.
Liquidation Risk: If the collateral value falls below the required maintenance margin, the borrower’s position may be liquidated, potentially at a loss.
High Interest Costs: During periods of high utilization, borrowing rates may increase sharply, making loans more expensive.
Collateral Volatility: Since most collateral is in volatile crypto assets, rapid price declines can quickly trigger margin calls and liquidations.
Over-Leverage Risk: Borrowing against volatile assets may amplify losses if the market moves unfavorably.
Sub-accounts give you more control by keeping funds seperate. They’re ideal if you want to manage different strategies, or capital without everything tied to one account.
Creating sub-accounts allows you to:
Separate risk. Losses or positions in one sub-account won’t affect funds over into others.
Run multiple strategies. Trade different approaches or portfolios independently.
Move funds easily. Transfer between your main account and sub-accounts for clear, simple capital management.
Sub-accounts help you trade smarter and safer by keeping activities organized and risks contained.
Log into your exchange account, click the account icon in the top right corner, then click “Add Subaccount.”
Create a username and click “Add Subaccount” again to save.
Change Your Password Immediately
Log in and go to Settings.
Update your password with a strong, unique combination.
Visit .
Enable Two-Factor Authentication (2FA)
If not active, go to Security Settings.
Set up 2FA using a reliable app like Google Authenticator.
Review Account Activity
Check your transaction history for unfamiliar actions or transactions.
Contact us at [email protected] with details of your concerns.
Include any unusual activity you’ve noticed.
To safeguard your Backpack Exchange account, it’s crucial to recognize and prevent phishing attempts. Follow these steps:
Verify the URL
Always ensure you’re accessing the official site: .
Double-check the URL before entering any credentials.
Note:
Your online safety is vital. By staying informed and cautious, you can protect your account and assets from potential threats.
1. Open the Withdraw menu
2. Choose the cryptocurrency you wish to withdraw and enter the amount
3. Enter the destination address or open 'Address book' and select address
4. Click “Continue” and then enter your 'Email verification code' and 'Authenticator app code', select Submit button
Click “Withdraw.”
Under the “Subaccounts” tab, select the token you wish to transfer.
Enter the transfer amount.
From the dropdown menu, select the source subaccount.
From the dropdown menu, select the destination subaccount.
🎉 Done! Your funds will be credited shortly.
You'll need to register first before you can start trading on Backpack Exchange. Setting up your account on Backpack Exchange is simple and straightforward.
Input a valid email address
⚠️Note: You will need access to this email account later in the registration process.
Enter a referral code (if applicable).
A Conditional Order follows an “If–Then” logic structure:
IF the market price reaches the predefined trigger price,
THEN the system automatically submits an actual order (either a market order or a limit order).
Set Trigger Price → You define the condition (e.g., “If BTC falls to $25,000”).
Choose Execution Type → You decide whether the system should place a market order (immediate execution) or a limit order (at your chosen price).
Wait for Condition → Until the trigger price is reached, the order stays inactive and does not appear in the order book.
Confirm the benchmark price selected for the trigger — Mark Price, Index Price, or Last Traded Price.
If you set it to Mark Price but were monitoring the Last Traded Price, differences may occur.
A conditional order only triggers when the chosen benchmark actually reaches your trigger level.
A Market Order is an instruction to buy or sell immediately at the best available price in the order book.
When you want your order to be executed instantly.
Suitable for entering or exiting a position quickly, regardless of slight price changes.
Execution is guaranteed, but the price may vary slightly due to market liquidity (slippage).
Best for urgent trades, not for precise price control.
On the Futures Order Placement page, select the token you wish to trade.
After confirming the trade direction, choose Market Order.
Enter the order quantity.
Click Max Slippage Setting, then enter the maximum slippage you are willing to allow.
Click Submit to save the setting.
Confirm the order.
https://backpack.exchange/portfolio/balances/assets
At Backpack Exchange, protecting your account security is our top priority.
To change your email address, please follow the steps below and submit the required information to [email protected].
Please note: Email changes typically take 2–4 business days to complete.
Send an email to Customer Support
In the subject line, enter “Email Change”, “Change Email”, or similar.
If you do not receive a reply from Support within 48 hours, please send a follow-up email.
Complete Sumsub Verification
After receiving a reply from Support, you will be provided with a Sumsub verification link.
Access the link and complete the identity verification process.
Reply to the email and submit the required identity information
The information you need to provide includes, but is not limited to:
Name and Address Confirmation
Please provide your full legal name and current residential address associated with your Backpack Exchange account.
Source of Income
Once we receive your information, your account will be placed under a 48-hour security freeze.
During this period, we will carefully review and verify your information to ensure account security.
After the review is approved and the security freeze period has ended, we will proceed with changing your email address.
If you have any questions or need further assistance, please contact Backpack Support at . We will guide you through the entire process to ensure a smooth and secure experience.
Backpack Exchange is committed to maintaining the security and integrity of your account. Thank you for your understanding and cooperation!
Interest rates represent the cost of borrowing assets or the yield earned by lenders who supply liquidity. Rates are typically variable and adjust dynamically based on market conditions, primarily driven by Utilization (the percentage of funds in the pool that have been borrowed).
Utilization-Based Model
When Utilization is low, borrowing demand is weak → interest rates are lower.
When Utilization is high, borrowing demand is strong → interest rates increase to encourage repayment and attract more deposits.
Borrower Interest Rate
Market Supply & Demand: More borrowing increases rates, while higher deposits reduce rates.
Liquidity Conditions: High utilization raises rates to incentivize lenders to supply more liquidity.
Platform Risk Management: Dynamic adjustments help maintain balance and protect against liquidity shortages.
Click “Lend” to enter the Lending page.
Open the token selection dropdown menu.
You will then be able to view the real-time borrow and lend rates for different tokens.
Utilization refers to the percentage of total available funds in a lending pool that have been borrowed by users. It reflects how much of the pool’s liquidity is currently in use.
Formula:
Utilization=Total Borrowed / Total Lent × 100%
For example:
If a pool has 1,000 USDT deposited and 800 USDT borrowed,
Then Utilization = 80%.
For Lenders:
High utilization means more of their funds are actively lent out, potentially earning higher interest.
Very high utilization, however, may limit withdrawal flexibility, as most funds are borrowed.
For Borrowers:
Optimal Utilization: The point where interest rates begin to increase rapidly to encourage more lending and loan repayments.
Throttled Utilization: The utilization rate threshold where lend redeems and new borrows are paused to prevent 100% utilization.
Max Utilization: The maximum utilization rate threshold where no lend redeems or new borrows are allowed, and positions may be automatically deleveraged.
The Rank Referral Program rewards top badge holders with a percentage match of the points earned by their referred users.
Who qualifies: Gold, Platinum, Diamond, Challenger (Season 2 only)
What you earn: a weekly points match on the points your referrals generate
First distribution: Week 8 of Season 2 (included in the standard weekly points payout)
Available to Affiliate participants. If you're already enrolled in the Affiliates program, you're still eligible.
Gold: 2%
Platinum: 3%
Diamond: 4%
Challenger: 5%
A user signs up with your referral code and completes KYC.
Each week, your referred users earn points based on their activity.
You receive a percentage match (per the rates above) on those points. The match is included in the weekly points distribution.
If your referred user earns 10,000 points in a week and your rank is Diamond, you receive 4% = 400 points that week.
Season-specific: Only Season 2 ranks are eligible.
Affiliate exclusion: Users in the Affiliates program are not eligible for Rank Referral matches.
Weekly cadence: Matches follow the normal weekly distribution schedule.
Deposit funds into your exchange account (crypto or fiat).
On the Order Placement page, select the appropriate market (Spot or Futures — here we take Futures as an example).
Select your desired trading pair (e.g., BTC-PERP)
Choose the trading direction (Buy/Sell)
Select Scaled Order as the order type.
Enter the required parameters
Price Range
Order Count(2-50)
Total Quantity
Select the order distribution type
Flat, Increasing, Decreasing
Click “Preview” to review the order
Optional settings
Post Only: Ensures your order is placed as a maker order and does not take liquidity.
IOC (Immediate or Cancel): Executes the order immediately as much as possible; any unfilled portion is canceled. Suitable for quick entries and exits.
Reduce Only: Ensures your order will only reduce your existing position and will not open a new position or increase the size of the current position.
Submit the order.
Season Timeline
Season 1: March 21, 2025 – May 29, 2025
Season 2: July 3, 2025 - September 10, 2025
Season 3: September 11, 2025 - November 19, 2025
Season 4: Started on November 20, 2025
Points Distribution
Points are distributed weekly, based on user activity across all products.
Criteria for points are continuously updated and intentionally opaque.
Goal: Reward users who contribute to Backpack’s growth.
Ranks
Ranks are tied to each season.
When a new season begins, all users start from zero.
Rank tiers: Bronze, Silver, Gold, Platinum, Diamond, Challenger
Special Drops
Legacy Drop: Snapshot taken on March 20, 2025, at ~09:00 UTC, allocated to historical users since late 2023.
Bonus Drop: 10 million points distributed to active users during the off-season between Season 1 and Season 2.
Affiliate Point Matching
Qualified affiliates earn elevated points based on the activity of referred users.
Granted at Backpack’s discretion.
User Access
View your points and rank:
Get started: Sign up at or download the Backpack app .
This guide provides a detailed overview of the required documentation for KYC verification.
To ensure the integrity and security of our platform, all individual and institutional customers seeking to trade on Backpack Exchange must complete our Know Your Customer (KYC) verification process.
Learn more about .
A Take-Profit (TP) order automatically closes your position once the market price reaches your chosen profit target. It’s designed to help you secure profits without needing to constantly monitor the market.
A Take-Profit order is activated when your selected trigger price source — Latest, Mark, or Index — reaches or exceeds the Take-Profit trigger price you set.
Long (Sell) → Triggered when the market price rises to or above your Take-Profit trigger.
A Stop-Loss (SL) order automatically closes your position when the market moves against you and reaches your defined loss threshold. It’s designed to help you manage risk and limit potential losses.
A Stop-Loss order is activated when your selected trigger price source — Latest, Mark, or Index — reaches or exceeds the stop price you set.
Long (Sell) → Triggered when the market price falls to or below your stop price.
When participating in crypto lending and borrowing, it is important to monitor market trends and assess risks. Exchanges provide charts, candlestick views, and trading indicators to help users analyze asset price movements, evaluate borrowing opportunities, and manage lending risks more effectively.
Transaction hashes or IDs
The “Transaction Details” can be checked by entering the wallet address at Solscan.io.
Execution →
If it’s a market order: it executes instantly at the best available price.
If it’s a limit order: it executes only at your specified price or better, if market liquidity allows.
Check whether you placed a limit order.
When using a limit order, once the trigger price is reached, the system will only place your order on the book.
The order will only be executed if the market price reaches or exceeds your specified limit price.
In highly volatile markets, there may be rapid fluctuations or gaps between price updates. If the benchmark price only touches the trigger price momentarily and does not register in the system, the conditional order may not be activated.
Program discretion: We may adjust or correct prior distributions at our discretion.
Purpose of transfer or other relevant documentation
⚠️ Important: Respond promptly to these requests to avoid delays, returned funds, or account restrictions.
Any other compliance documentation
If you receive such a request, please reply promptly with the information to avoid processing delays.
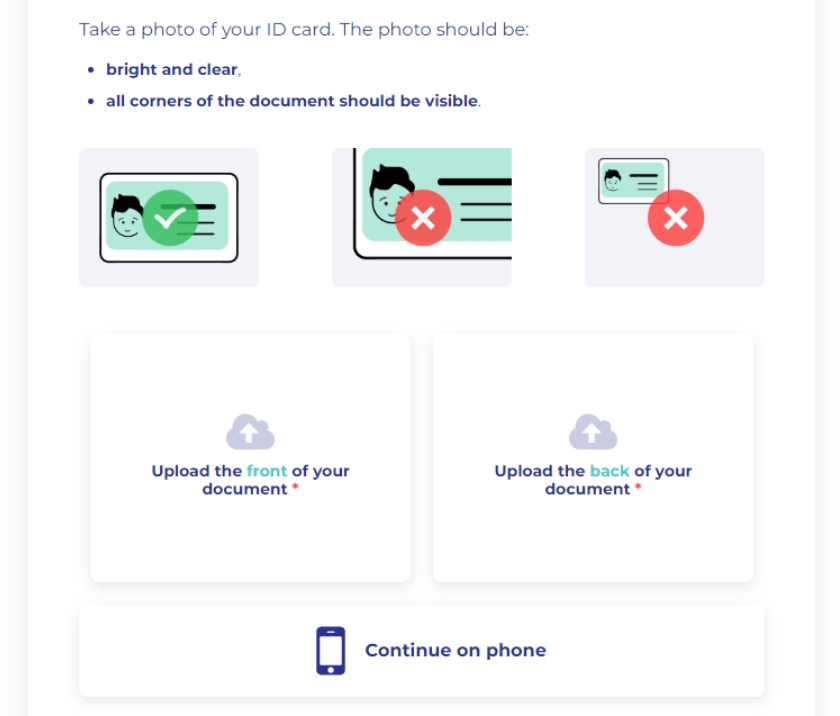
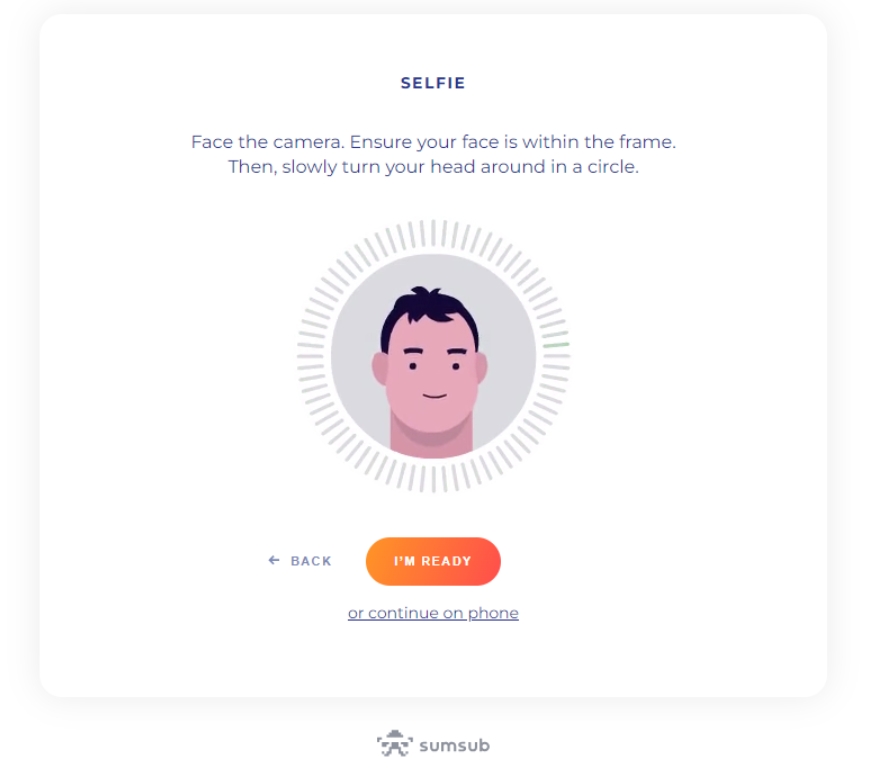
Upload a clear and valid identification document.
Complete a liveness check to verify your identity.
These standard requirements might be tweaked for certain specific countries. For example, residents in India, Brazil, Argentina, Indonesia, Nigeria may complete their identity verification via local governmental digital identity initiatives.
In certain countries, like Australia and the United Arab Emirates, additional information may be required such as a proof of address.
North Korea, Iran, Cuba, Syria, and the Crimea, Sevastopol, Luhansk, and Donetsk regions of Ukraine.
Canada
Japan
New Zealand
To ensure the integrity and security of our platform, all institutional customers seeking to trade on Backpack Exchange must complete our Know Your Customer (KYC) verification process.
This guide provides a detailed overview of the required documentation for institutional KYC verification.
Please specify the country where your institution was incorporated. This will determine specific KYC requirements as they may vary based on jurisdiction.
Provide the full, legal name of your institution.
Indicate from which country or region you expect to conduct trading activities on the Backpack Exchange.
Indicate the primary industry or sector your company operates in.
Provide a valid contact number for your institution.
State the complete physical address of your institution.
Detail the primary sources of income for your institution (e.g., sales, investments).
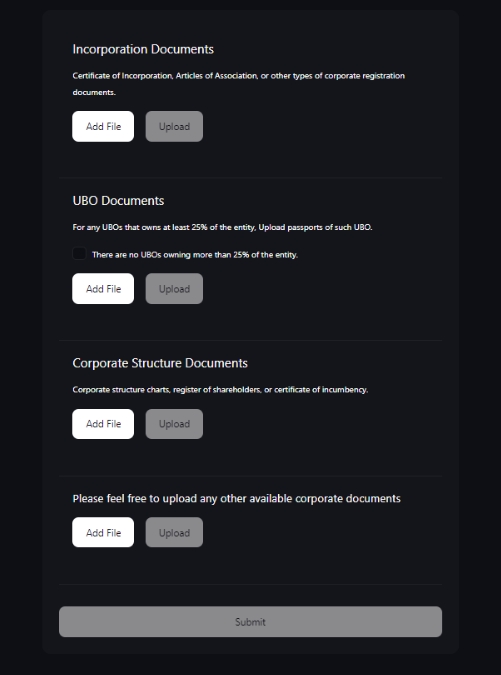
Please upload either:
Certificate of Incorporation;
Articles of Association; or
Any other corporate registration documents
For any UBO owning 25% or more of the entity:
Identification: Upload a clear copy of the UBO's national ID or passport.
Ownership Attestation: Confirm that there are no other UBOs owning more than 25% of the entity.
Please provide one of the following to clarify the corporate structure:
Corporate structure chart;
Register of shareholders; or
Certificate of incumbency
Optional:
If you have additional documents that you believe will assist in the verification process, please feel free to upload them.
It's vital to ensure that all provided information is accurate and up-to-date.
Incomplete or inaccurate submissions may lead to delays in the verification process.
For the Know Your Customer (KYC) process, a Proof of Address (PoA) document is required by Sumsub to verify your residential address.
This is a crucial step to ensure the security and integrity of our platform and your financial transactions.
Your PoA document must include your full name, your current residential address, and the date of issuance. The document should be recent (typically within the last 3 months) to ensure that the information is current.
Utility bill (Gas, Water, Electricity, or Internet)
Bank statement
Credit card statement
Tax bill or official government correspondence
First Page: The document must have your name, address, and date clearly visible on the first page.
One-Page Document: If possible, the document should be a single page.
Date of Document: The issue date should be within the last 3 months to ensure the information is up to date.
Legibility: The document must be clear and easy to read. Blurry, low-resolution, or otherwise illegible documents will not be accepted.
Unaltered: The document must not be edited or redacted in any way.
When uploading your Proof of Address document, please adhere to the following accepted formats. The maximum file size for each document is 50 Mb.
File formats:
JPEG
JPG
PNG
If you encounter any issues or have a document that does not meet the above criteria, you can still submit it for manual review. Our team will examine the document and assist you in completing the KYC process.
Document larger than one page: If your document is more than one page or does not meet the guidelines, please upload it anyway.
Manual Review: Our team will manually review any document you upload, even if it does not strictly meet the guidelines.
Contact Us: If you need assistance or have questions, please feel free to contact our support team at [email protected].
Remember, we are here to help you through the verification process.
Your security and privacy are our top priorities.
Short (Buy) → Triggered when the market price falls to or below your Take-Profit trigger.
Once triggered, the TP order converts into a Market or Limit order depending on the execution type selected.
Take-Profit Market Order
Executes immediately at the best available market price once triggered.
The final execution price may differ from your trigger price due to slippage or price gaps, especially during high volatility.
Full or partial fills may occur depending on available liquidity.
Take-Profit Limit Order
Places a limit order at your specified limit price once triggered.
Provides price control, but execution is not guaranteed — if the market reverses quickly, the order may remain partially filled or unfilled.
Long (Sell)
Trigger Price ≤ Limit Price
Setting the limit price slightly above the trigger price improves the likelihood of execution.
Short (Buy)
Trigger Price ≥ Limit Price
Setting the limit price slightly below the trigger price improves the likelihood of execution.
You can choose which price source triggers your Take-Profit order:
Mark Price — Helps avoid false triggers from short-term market spikes.
Last Traded Price — More sensitive to price movement but can trigger early in volatile conditions.
Index Price — Reflects a weighted average across multiple markets and helps maintain consistent triggering.
During high volatility, Market TP orders may execute far from your trigger price.
Limit TP orders may not execute if the price moves away too quickly.
To improve reliability, set a small buffer between your trigger and limit prices.
Ensure your trigger source matches your trading intent (Mark Price recommended for most users).
Short (Buy) → Triggered when the market price rises to or above your stop price.
Once triggered, the Stop-Loss order converts into either a Market or Limit order based on your chosen execution type.
Stop-Market Order
Once triggered, the order converts to a market order, executing immediately at the best available price.
The execution price may differ from your stop price due to slippage or price gaps, particularly in fast-moving markets.
Partial fills may occur depending on liquidity at the time of execution.
Stop-Limit Order
Once triggered, the order becomes a limit order at your specified limit price.
Provides price control, but execution is not guaranteed — if the market continues to move away from your limit price, the order may remain unfilled and fail to provide stop-loss protection.
Long (Sell)
Trigger Price ≥ Limit Price
Setting the limit price slightly below the trigger price increases the chance of execution during downward movement.
Short (Buy)
Trigger Price ≤ Limit Price
Setting the limit price slightly above the trigger price increases the chance of execution during upward movement.
Choose which price source triggers your Stop-Loss order:
Mark Price — Reduces the chance of false triggers caused by short-term price spikes.
Last Traded Price — More sensitive to rapid market movements but may trigger early during volatility.
Index Price — Reflects an aggregated market rate and offers stability during abnormal price fluctuations.
During extreme volatility, Stop-Market orders may execute far from your trigger price.
Stop-Limit orders may fail to execute if the market price moves past the limit price too quickly.
In both cases, your position may remain open longer than expected, increasing potential losses.
For most users, Mark Price triggers offer the best balance between stability and timely activation.
Account name
SWIFT/BIC
IBAN / Account number
Sort code (if applicable)
Reference (include this exactly to credit your account)
Bank name & address
Recipient address
Please ensure accuracy to avoid delays.
Charts provide a visual representation of price and market activity for each cryptocurrency. They help users:
Track historical price trends.
Identify support and resistance levels.
Monitor volatility, which may impact interest rates and borrowing risk.
Key Tip: For lenders, monitoring charts helps assess the stability of the asset being lent. For borrowers, it helps time entry and exit to avoid borrowing during highly volatile conditions.
A candlestick chart shows how the price of an asset has moved during a specific time interval (e.g., 1 minute, 1 hour, 1 day). Each candlestick contains four key data points:
Open – The price at the beginning of the interval.
Close – The price at the end of the interval.
High – The highest price reached during the interval.
Low – The lowest price reached during the interval.
Usage in Lending & Borrowing:
Candlesticks help identify short-term vs. long-term market trends.
Sharp price movements may signal higher borrowing risk (liquidation risk).
Stable price patterns suggest safer lending or borrowing conditions.
Indicators are technical analysis tools applied to charts that help interpret market conditions. Commonly used indicators include:
Moving Averages (MA / EMA): Show overall trend direction. Helpful to decide when to borrow or repay.
Relative Strength Index (RSI): Measures overbought or oversold conditions. Can indicate potential price reversals.
Bollinger Bands: Reflect price volatility; wide bands suggest high volatility, which may increase liquidation risk for borrowers.
Volume Indicators: Show trading activity; high volume may mean stronger support/resistance levels.
Usage in Lending & Borrowing:
Borrowers can use indicators to avoid entering positions in overheated markets.
Lenders can use them to gauge market sentiment before supplying assets.
Charts and candlesticks visualize market data, helping both borrowers and lenders make informed decisions.
Indicators provide deeper insights into trends, momentum, and volatility.
Monitoring these tools helps reduce risks, such as unexpected liquidations for borrowers or asset devaluation for lenders.
Market Dependency
Highly dependent on price movement; orders fill only if the market hits your levels.
Less dependent on price movement; trades are executed over time regardless of volatility.
Leverage
Typically lower ranges (e.g., ~2×–5×), varies by asset and collateral
Typically higher ranges (e.g., ~10×–50×), varies by market
Carry / Ongoing costs
Trading fees + borrow interest
Trading fees ± funding payments (you may pay or receive)
Settlement
Spot settlement; inventory changes in your wallet
Perpetual contract; PnL settles continuously via funding
Use case
Directional exposure to the asset, shorting via borrow, inventory hedging
Directional exposure without holding the asset, hedging, basis/funding strategies
Instrument
You hold the underlying asset (borrowed or owned)
You trade a derivative contract that tracks an index price
Distribution schedule:
Every Friday at 02:00 UTC
Based on activity ending Thursday at 00:00 UTC
Backpack reserves the right to adjust previous point distributions.
Beware of Unsolicited Communications
Be cautious with suspicious emails or messages claiming to be from Backpack Exchange.
We will never ask for your password or 2FA codes.
If anyone asks for them, they are a scammer.
Examine Email Senders
Double-check the sender’s email address.
Phishers may use addresses that look similar but with small alterations.
Avoid Clicking on Suspicious Links
Do not click on links or download attachments from unknown sources.
Hover over links to preview the destination URL before clicking.
Report Suspicious Activity
If you encounter anything suspicious related to Backpack Exchange, contact [email protected] immediately.


Choose whether to enable 2FA for withdrawals (recommended).


Click “Transfer.”


Whether to enable notifications
Choose the corresponding token, verify the source and destination accounts, and then click “Transfer.”


After clicking “Sign Up,” create a strong and unique password.
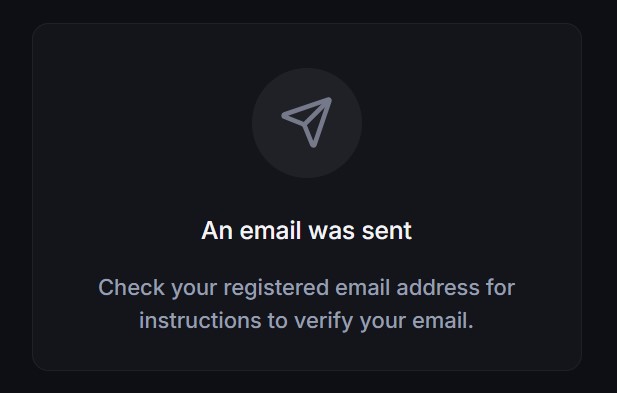
Click “Next,” then enter the one-time passcode (OTP) sent to your registered email.
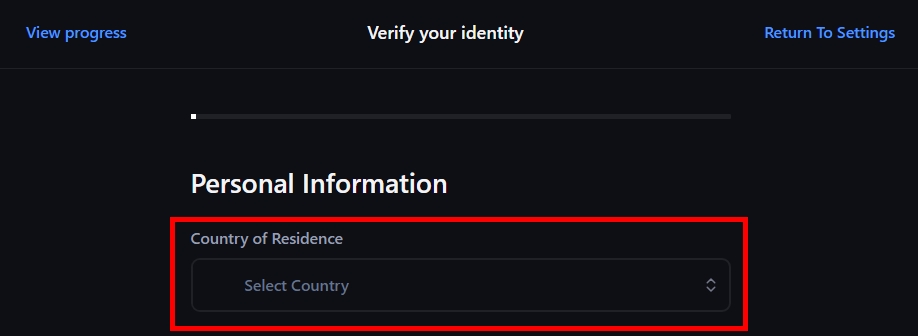
Click “Start” to begin the Identity Verification process:
Choose your Country of Residence, then click “Next.”
Enter your personal information, then click “Continue.”
Enter your address exactly as it appears on your government-issued ID.
Select your source of funds and employment status truthfully, then click “Continue.”
Provide alternative contact information, then click “Continue.”
Verify your identity.

Please provide your primary source of income or occupation details for identity verification.
Transaction Details
Provide as much detail as possible about your account transactions, including (but not limited to):
Transaction dates
Asset names
Asset amounts
Transaction hashes or IDs
The “Transaction Details” can be checked by entering the wallet address at.
This is the rate borrowers pay on borrowed assets.
The rate adjusts dynamically depending on the pool’s Utilization level.
Lender (Deposit) Interest Rate
This is the yield lenders earn by supplying assets.
It is derived from the borrowing interest rate, after accounting for the exchange/protocol’s fee (if applicable).

High utilization can lead to higher interest rates, as demand for liquidity is strong.
Low utilization generally means lower borrowing costs and easier access to funds.
For the Exchange:
Utilization helps balance supply and demand in the lending market.
It influences the dynamic interest rate model — interest rates often increase when utilization is high, encouraging repayment and new deposits.
Note: Have your documentation prepared, you must upload scans or photos of each document.
Note: You can complete this step using a mobile phone.
Note: Verification is not always instantaneous.
Typically 1–5 business days
Fees
0 USD
*Backpack charges no fee for sending or receiving USD wires. Your sending/ intermediary bank may apply its own charges, which are outside our control.
✅ Verified Backpack Exchange account
✅ Available USD balance in your Bank Account
Log in to Backpack.exchange.
Open the Deposit modal
In the top-right corner, click Deposit
Select Cash (USD) → Wire Transfer
Note: The minimum deposit is $100, and we accept USD only.
click Continue.
You’ll see everything you need on the “Wire transfer” screen:
Account name
SWIFT/BIC
IBAN / Account number
Sort code (if applicable)
Reference (include this exactly to credit your account)
Bank name & address
Recipient address
From your personal bank account, initiate a SWIFT transfer using the details above. Make sure:
The sending account is in your name (third-party transfers are rejected).
You send USD only.
⚠️ Important: Deposits must come from a bank account in your name. Third-party deposits are not supported.
🎉 All done! Your USD deposit is now on its way to Backpack.
Need help or have questions? Reach our support team anytime at [email protected]. Be sure to include your wire transfer reference for faster assistance.
Currency
USD via SWIFT
Minimum Deposit
100 USD
Processing Time
The funding rate is the rate paid between longs and shorts every 1 hour.
If positive, longs pay shorts, if negative, shorts pay longs.
The countdown shows the time remaining until the next payment.
If you close your position before the countdown ends, you will neither pay nor receive the funding fee.
The funding rate settlement cycle is currently 1 hour.
If there are any changes, they will be updated under “Market Info” for the corresponding token.
You can also check this information before trading.
The funding rate reflects market conditions and is not controlled by the exchange.
It is mainly determined by the difference between the perpetual futures price and the spot price, market supply and demand, and borrowing costs.
For details on how funding rates are calculated, please refer to the documentation
On the exchange page, click “More” → “Market Info” →
Click “Funding History”, from the dropdown menu, select the token you want to review. You will see the funding rate details across different timestamps.
To view a line chart of the token’s historical funding rates:
Go to the Order Placement page, select the token from the dropdown menu on the left.
Under the Funding tab, you can see the historical line chart.
Hover over the line to view the funding rate at a specific time.
Click Portfolio.
Under the Futures tab, click Funding.
Use the dropdown menu on the right to select the token you want to view.
Order Notifications: When enabled, you will receive order notifications at the bottom right of the page, including successful order placements and executions.
Audio Alerts: When enabled, an audio notification will play after certain events.
Mask Balances & Info: When enabled, balances and account details (such as your email address) will be masked.
Market Close Confirmation:
If disabled: A market order will close your entire position without asking for confirmation.
If enabled: You can customize the quantity to close and view the expected PnL.
Note: Positions with a notional value above $100,000 will always require confirmation.
Show Funding Rates Ticker: When enabled, the funding rates ticker will be displayed at the bottom of the trading page.
Log into your exchange account → go to Settings → under the Account tab → Leaderboards, and enable Visibility. Once enabled, your activity will be hidden from the leaderboards.
If you would like to receive important updates or exclusive benefits:
Log into your exchange account → go to Settings → under the Account tab → Contact Info, click Edit.
Select a social contact platform, enter your username or phone number, and click Save.


USDC
Solana, Ethereum, SUI, Arbitrum, Base, Optimism, Polygon, Sei EVM, Aptos
USDT
Backpack Exchange only supports native stablecoin deposits on their respective networks. Depositing the wrong version of a stablecoin may result in your funds not being credited.
On the Optimism network, Backpack only supports deposits of USDT0 with the contract address:
We do not support deposits of USDT with the contract address:
If you deposit USDT (not USDT0) on Optimism, the funds will not be credited to your Backpack account.
Before making a transfer:
Verify the deposit address and network carefully
Read all notices and warnings displayed on the deposit page
Contact our official support team if you're unsure which network or token to use
Search for the token if you don't see it in list.
If you’d like to delete your Exchange account, please email [email protected] from the same email address linked to your account. Use “Account Deletion” as the subject line. Our team will guide you through the next steps and confirm once the process is complete.
⚠️Please note that once deleted, you will not be able to register again within 6 months.
Backpack is committed to safeguarding your personal data and retaining it only as long as law and regulation require. Because we operate in a regulated financial environment, we cannot delete a verified account or its historical records until the statutory retention period has elapsed (typically five to seven years, depending on jurisdiction). The sections below explain why and outline the steps you can take to wind down your relationship with us while your data remains in mandatory retention.
Customers with a Backpack Exchange account (web or mobile)
Users of Backpack Wallet who completed identity verification for the exchange
Backpack Wallet is a self‑custodial application. Your private keys never leave your device, and we do not maintain a server‑side “wallet account.” Because we hold no wallet data, there is nothing for us to delete—simply uninstall the app or extension.
Deletion and retention rules described below apply only to Backpack Exchange accounts.
Financial‑services regulations—particularly Know‑Your‑Customer (KYC) and Anti‑Money‑Laundering (AML) rules—require regulated exchanges to preserve certain records for prescribed periods. These obligations apply to Backpack in every jurisdiction where we operate.
Once the statutory window closes—usually five to seven years, depending on jurisdiction—we securely erase or anonymise records wherever law permits.
Withdraw assets and close positions — transfer funds away and settle any open trades.
Cease using the service — sign out, uninstall the application, and clear browser data.
Opt out of marketing messages — click “unsubscribe” in any Backpack email.
Request a review — if you believe special circumstances apply, contact us; we assess each request individually and may deactivate certain functionality on a case‑by‑case basis.
Your account will remain inactive, and all retained data will continue to be stored securely with restricted access.
If you have any concerns about your data or wish to inquire further about account closure or deactivation options, please reach out to us via the following channels:
Email:
Live Chat: and click on the chatbot in the lower right hand portion of your screen.
All requests are reviewed individually and carried out in accordance with data‑protection laws and our internal compliance standards. Your information is protected, held only for the legally required period (generally 5–7 years), and never processed beyond legitimate business or regulatory purposes. To learn more about your rights—including access, restriction, or objection—please see our Privacy Policy.
Deposit funds into your exchange account (crypto or fiat).
Navigate to the Spot Trading section
Select your desired trading pair (e.g., SOL/USD)
Choose the trading direction (Buy/Sell)
Select the
Enter the required parameters
Price
Quantity
... (and other necessary parameters)
Optional settings
Post Only: Ensures your order is placed as a maker order and does not take liquidity.
IOC (Immediate or Cancel): Executes the order immediately as much as possible; any unfilled portion is canceled. Suitable for quick entries and exits.
Margin: Uses leverage to improve capital efficiency (note: this increases liquidation risk).
Submit the order.
Deposit funds into your exchange account (crypto or fiat).
Navigate to the Spot Trading section
This quick guide shows you exactly how to wire USD from your Wise account to Backpack
Currency
USD via SWIFT
Minimum Deposit
Ensure you have:
✅ Wise account and available funding method
✅ Backpack Exchange wire details (SWIFT, IBAN, Account Name, Reference Code)
Log in to .
Go to Deposit
Select Cash (USD) → Wire Transfer → click Continue
Copy:
SWIFT/BIC
IBAN/Account Number
Account Name
Reference Code
Log in to your Wise account (website or app)
Click on the green 'Send' button
On the 'Select their currency' screen, choose your 'Source currency' (local currency or USD if funded) and set the Target currency to USD
On the 'Add a recipient' screen, select 'Bank details'
Select 'Business or Charity' recipient (required as Backpack is a business)
Enter Backpack’s Beneficiary Name, IBAN, and SWIFT/BIC
Select the payment currency and enter the amount, click 'Continue'
review fees, In the 'Payment reference / Message' field, paste your Backpack Reference Code, and click 'Continue to instructions' to complete the transfer
Wise will display real-time status updates: Processing → Sent.
Funds usually appear in your Backpack account within 1–5 business days.
If the transfer hasn't been credited after 5 business days, contact Wise and Backpack Support with your wire details.
🎉 Great work! Your deposit is on its way.
If you encounter any issues, our support team is available 24/7. Contact us at [email protected], and please include your wire details for quicker assistance.
Navigate to the Spot Trading page
Select your desired trading pair and position direction (Buy/Sell)
Choose ‘TWAP’ as your order type
Enter required parameters:
Total Quantity
Running Time
Frequency
Optional settings:
Check ‘Randomize’ to enable randomized order execution
Check ‘Margin’ to use leverage
Place your order
Navigate to the Futures Trading page
Select your desired trading pair and position direction (Buy/Sell)
Choose ‘TWAP’ as your order type
Enter required parameters:
After entering the trading interface via 'Trade', click 'Spot' in the top-left corner
Select your desired trading pair and position direction (Buy/Sell)
Choose ‘TWAP’ as your order type
Enter required parameters:
After entering the trading interface via 'Trade', click 'Futures' in the top-left corner
Select your desired trading pair and position direction (Buy/Sell)
Choose ‘TWAP’ as your order type
Enter required parameters:
Deposit funds into your exchange account (crypto or fiat).
On the Order Placement page, select the appropriate market (Spot or Futures — here we take Futures as an example).
Select your desired trading pair (e.g., BTC-PERP)
Choose the trading direction (Buy/Sell)
Select Conditional Order as the order type.
From the dropdown menu, choose the benchmark for the trigger price.
If you want the order to be executed as soon as the trigger price is reached
Enter the required parameters directly(Trigger Price and Quantity )
If you want the order to be executed at a specified price after the trigger price is reached
Check “Limit Order” to set the specified execution price.
Enter the required parameters(Trigger Price, Limit Price and Quantity )
Optional settings
Post Only: Ensures your order is placed as a maker order and does not take liquidity.
IOC (Immediate or Cancel): Executes the order immediately as much as possible; any unfilled portion is canceled. Suitable for quick entries and exits.
Reduce Only: Ensures your order will only reduce your existing position and will not open a new position or increase the size of the current position.
Submit the order.
A passkey is a login method that replaces traditional passwords with device-based authentication such as fingerprint, face recognition, or a local device PIN. It’s built on the FIDO2/WebAuthn standard and helps reduce common risks like phishing and credential theft.
Passkeys work differently than traditional passwords:
They are unique to each account and bound to your device.
They use biometric or PIN verification on your device instead of something you type.
Because of this, they are less vulnerable to phishing and credential reuse.
Log into your exchange account, click the Settings button in the top right corner, and select Security, under the Passkey section, click Enable.
Enter the 6-digit code from your authenticator app linked to your account, and click Add Passkey.
Select your browser’s password manager, or set up your device fingerprint or a PIN to save your passkey for use on backpack.exchange.
Then follow the on-screen instructions based on your selected method.
This quick guide shows you exactly how to wire USD from your ZA account to Backpack
Overview
If you still haven’t received any update, please email [email protected] directly, and our team will follow up.
For business use, apply for an entity account instead.
Need to correct your information? Contact [email protected].
... (and other Optional settings)
Select your desired trading pair (e.g., SOL/USD)
Choose the trading direction (Buy/Sell)
Select the order type.
Enter the required parameters
Price
Quantity
... (and other necessary parameters)
Optional settings
Post Only: Ensures your order is placed as a maker order and does not take liquidity.
IOC (Immediate or Cancel): Executes the order immediately as much as possible; any unfilled portion is canceled. Suitable for quick entries and exits.
Margin: Uses leverage to improve capital efficiency (note: this increases liquidation risk).
... (and other Optional settings)
Submit the order.
Conditional Order – Set specific conditions for the order to be triggered when market criteria are met.
TWAP (Time-Weighted Average Price) – Execute a large order over a set period of time at regular intervals to minimize market impact and achieve an average price.
Scaled Order – Place multiple orders at different price levels, either progressively higher or lower, to take advantage of price fluctuations.


Total Quantity
Running Time
Frequency
Optional settings:
Check ‘Randomize’ to enable randomized order execution
Check ‘Reduce Only’ to exclusively reduce existing positions
Place your order
Total Quantity
Running Time
Frequency
Optional settings:
Check ‘Randomize’ to enable randomized order execution
Check ‘Margin’ to use leverage
Place your order
Total Quantity
Running Time
Frequency
Optional settings:
Check ‘Randomize’ to enable randomized order execution
Check ‘Reduce Only’ to exclusively reduce existing positions
Place your order


TP/SL (Take Profit/Stop Loss): Sets predefined price levels at which your position will be automatically closed to lock in profits (TP) or limit losses (SL).
... (and other Optional settings)


Support correspondence
❌
Security verification and legal traceability (typically 5–7 years)
Account identifiers (email, username)
❌
KYC / AML record‑keeping (typically 5–7 years)
Identity documentation
❌
Audit trail, fraud prevention (typically 5–7 years)
Trade, funding & withdrawal history
❌
Financial‑record retention requirements (typically 5–7 years)
Linked on‑chain wallet addresses
❌
Permanent part of the transaction record
Solana, Ethereum, Tron
BTC
Bitcoin, Solana (Coinbase BTC)
ETH
Ethereum, Arbitrum, Base, Optimism
SOL
Solana


0x01bFF41798a0BcF287b996046Ca68b395DbC10710x94b008aA00579c1307B0EF2c499aD98a8ce58e58This can take up to 3 days during high demand periods.
If your KYC Identity Verification has been pending for more than 3 days, please feel free to contact our support team at [email protected].
If you would like to view your account alias, go to Settings → under the Account tab → Leaderboard, where you will find your alias, and the alias of the account that referred you.
The name of the main account cannot be changed. Only sub-account nicknames can be customized. To change it:
Navigate to the sub-account.
Click Portfolio, then click Edit.
Enter your desired nickname and click Save.
Go to Settings → under the Account tab → Fees, where you can view your current spot and futures fee tier.
Fee tiers are determined based on your trading volume over the past 30 days. Please refer to the fee schedule for more details.
After logging into your exchange account, go to Portfolio → under the Account Overview tab → click Balance, then click Statements.
Here you can view details such as assets, liabilities, and net equity for the sub-account.
After logging into your exchange account, go to Portfolio → click Performance.
Select the item you want to view, check Cumulative, and choose the time range to see your trading volume.
Log into your exchange account → go to Settings → under the Account tab → Preferences, then select your preferred display language.
Order Notifications: When enabled, you will receive order notifications at the bottom right of the page, including successful order placements and executions.
Audio Alerts: When enabled, an audio notification will play after certain events.
Mask Balances & Info: When enabled, balances and account details (such as your email address) will be masked.
Market Close Confirmation:
If disabled: A market order will close your entire position without asking for confirmation.
If enabled: You can customize the quantity to close and view the expected PnL.
Note: Positions with a notional value above $100,000 will always require confirmation.
Show Funding Rates Ticker: When enabled, the funding rates ticker will be displayed at the bottom of the trading page.
Log into your exchange account → go to Settings → under the Account tab → Leaderboards, and enable Visibility. Once enabled, your activity will be hidden from the leaderboards.
If you would like to receive important updates or exclusive benefits:
Log into your exchange account → go to Settings → under the Account tab → Contact Info, click Edit.
Select a social contact platform, enter your username or phone number, and click Save.

Visit Backpack Exchange's social media, it is the official announcement channel if there are any reported outages or scheduled maintenance.
Verify the status of Backpack Exchange using the official status tracker.
Sometimes, a simple refresh can solve minor connectivity hitches.
Accumulated cache and cookies might cause outdated data or glitches. Clear them to potentially resolve connectivity issues. (Refer to our guide on "How to clear browser cache and cookies" for step-by-step instructions.)
Switch to another browser to see if the issue persists. This can help determine if the problem is browser-specific.
If possible, try accessing Backpack Exchange from another device.
Ensure you have a stable internet connection. You can check this by visiting other websites or using online speed tests.
Consider restarting your router or contacting your Internet Service Provider (ISP) if you suspect connectivity issues on their end.
If, after trying the above steps, you still face connectivity issues, reach out to us at [email protected] for further assistance.
We're here to help ensure you have a seamless trading experience.
To clear your browser cache, follow the steps below for your browser.
Click the three dots (or vertical ellipsis) in the top right corner.
Select "More tools" > "Clear browsing data."
Choose "Cookies and other site data" and "Cached images and files."
Click "Clear data."
Click the three horizontal lines (hamburger icon) in the top right corner.
Select "Options" > "Privacy & Security."
Under "Cookies and Site Data," click "Clear Data."
Ensure both "Cookies and Site Data" and "Cached Web Content" are checked, then click "Clear."
Click the three dots in the top right corner.
Choose "Settings" > "Privacy, search, and services."
Under "Clear browsing data," click "Choose what to clear."
Select "Cookies and other site data" and "Cached images and files," then click "Clear now."
Click "Safari" in the top left menu, then select "Preferences."
Go to the "Privacy" tab and click "Manage Website Data."
Click "Remove All" and confirm.
If your Backpack Wallet shows a blank screen or won’t load, try the following steps:
Make sure the extension is updated to the latest version.
Turn the extension off and back on in your browser’s extension menu.
If the issue continues, reinstall the extension.
⚠️ Before reinstalling, ensure that your Seed Phrase or Private Keys are saved and available so you can re-import your wallets.
Check that the app is updated to the latest version.
Force close the app and re-open it (you may need to try this multiple times).
If the issue continues, reinstall the app.
⚠️ Before reinstalling, ensure that your Seed Phrase or Private Keys are saved and available so you can re-import your wallets.
100 USD
Processing Time
Typically 1–5 business days
✅ Verified Backpack Exchange account
✅ Chase online banking or mobile app access
✅ Available USD balance in your Chase checking account
Log in to Backpack.exchange.
Select Deposit
Select Cash → Wire Transfer → click Continue.
Review the deposit instructions, login to your bank to send a wire transfer and copy across the wire details (Account/Recipient Name, Address, SWIFT/BIC, IBAN/Account Number, Reference Code).
Note: You must include your unique Reference Code in the wire memo/details
💻 On the Chase Website:
Sign in at chase.com.
Select Pay & Transfer (top navigation bar).
Select Wires & global transfers.
Select Add a recipient.
Choose Payment Purpose → Investing in cryptocurrency.
Select Add recipient bank.
Enter the Recipient bank details (see bank info above).
Enter the Recipient Business details (see Backpack info above).
Confirm the details are correct and select Add recipient.
Select Schedule a Wire.
Select Recipient (Recipient info you added above) → Next.
Enter the amount you want to send.
Enter your unique Reference Code (see above) in the Message to recipient field.
Click Next.
Review the wire transfer information and select Authorize wire in U.S. Dollars (USD).
📱 On the Chase Mobile App:
Log in and tap Pay & Transfer (bottom navigation bar).
Tap Wires & global transfers
Tap International → Schedule a wire.
Select Recipient (Recipient info you added above) → Next
Enter the amount you want to send
Endter your unique Reference Code (see above) in the Message to Recipient field
Click Next
Review the wire transfer information and select Authorize wire in U.S. Dollars (USD)
Tip: If you can't see Wires & global transfers, first navigate to Pay & Transfer → Manage recipients and accept Chase’s wire agreement. The option will then appear.
Enter the amount (Minimum: USD 100).
Review any Chase wire fees.
Complete 2-factor authentication and submit your wire.
Your funds typically arrive in your Backpack account within 1–5 business days.
If funds aren't credited after 5 business days, contact both Chase and Backpack Support. Provide your wire confirmation receipt.
🎉 All done! Your USD deposit is now on its way to Backpack.
Need help or have questions? Reach our support team anytime at [email protected]. Be sure to include your wire transfer reference for faster assistance.
Currency
USD
Minimum Deposit
When you want to reduce visibility to bots or other traders
Navigate to the Spot Trading section
Select your desired trading pair (e.g., SOL/USD)
Choose the trading direction (Buy/Sell)
Select Order Type
Enter the required parameters
Price
Quantity
Check the "Margin" box
Submit the order.
Deposit funds into your exchange account (crypto or fiat).
Navigate to the Spot Trading section
Select your desired trading pair (e.g., SOL/USD)
Choose the trading direction (Buy/Sell)
Select
Enter the required parameters
Price
Quantity
Check the "Margin" box
Submit the order.
✅ Verified Backpack Exchange account
✅ ZA Bank online/mobile banking
✅ USD in your ZA Bank account
Log in to Backpack.exchange.
Go to Deposit
Select Cash (USD) → Wire Transfer → click Continue.
Copy Account Name, SWIFT/BIC, IBAN / Account Number (where applicable), and Account Name, Reference Code.
Open your ZA Bank app.
Select Transfer from the homepage.
Tap Global Transfer
Enter the amount you’d like to transfer (minimum $100 USD).
Make sure the receiving currency is set to USD.
ZA Bank utilizes Wise to facilitate international remittances. You will be redirected to Wise to securely complete the recipient’s bank details and confirm your payment.
On the Wise interface provided by ZA Bank, enter the following Backpack wire details exactly as they appear in Backpack:
SWIFT/BIC
(paste from Backpack)
IBAN/Acct No.
(paste from Backpack)
Account Name
(exactly as provided by Backpack)
Memo/ Reference
(paste Backpack reference code)
After filling in these details, confirm the information and continue.
Note: Bank information is based on Backpack and Wise details provided at the time of the transaction. Always verify the latest details before proceeding.
Review the fees (if applicable), then tap Confirm.
Authorize the transaction using Face ID or your PIN.
Your deposit should arrive in your Backpack account within 1–5 business days.
If your funds haven't been credited after 5 business days, contact Backpack Support and provide your wire details.
🎉 Great work! Your deposit is on its way.
If you encounter any issues, our support team is available 24/7. Contact us at [email protected], and please include your wire details for quicker assistance.
Currency
USD via SWIFT
Minimum Deposit
100 USD
Processing Time
Typically 1–5 business days
100 USD
Processing Time
Typically 1–5 business days
Ensure you have:
✅ Wise USD Balance with account details enabled
✅ Available USD balance in Backpack Exchange
Log in to Backpack.exchange.
Click on Withdraw
Select Cash (USD).
Open your Wise account.
In the Home tab, select your USD balance.
Click Account details to view:
Account Number
Wire routing
SWIFT/BIC
Full legal name and address
Copy these details for use in Backpack.
In Backpack withdrawal modal, select "Select Recipient" → click Add Bank Account.
Country
(Exactly as on Your Wise account)
SWIFT/BIC
(Paste from Wise)
Account No.
(Paste from Wise)
Name
(Exactly as on Wise account)
Address
(Exactly as on Wise account)
Click "Add Bank Account" to save.
Enter the amount you wish to withdraw (Minimum: USD 100).
Select the Sub-account you wish to withdraw from.
Choose your saved Wise Bank account from the recipient list.
Click Continue.
Complete 2-factor authentication and confirm your withdrawal.
Funds should arrive in your Wise account within 1–5 business days, minus any inbound fee charged by Wise.
If funds are not received within 5 business days, contact Backpack Support with your withdrawal details.
🎉 Success! Your withdrawal is now processing. Need help? Contact our support team at [email protected]. Remember to include your withdrawal details for quick assistance.
Currency
USD via SWIFT
Minimum Withdrawal
Typically 1–5 business days
Fees
0 USD*
*Backpack charges no fee for sending or receiving USD wires. Your intermediary / receiving bank may apply its own charges, which are outside our control.
✅ Verified Backpack Exchange account
✅ Available USD balance in Backpack Exchange
✅ Your Bank Account Number
Log in to Backpack.exchange.
Click on Withdraw
Select Cash (USD).
Add or select a bank account
If you haven’t added a recipient before, click "Select Recipient" → click Add Bank Account :
Recipient country
Bank identifier type
SWIFT/BIC for most international wires
Sort code (UK/Ireland only)
SWIFT/BIC code or Sort code (depending on your choice)
Account number
Recipient details:
Type (Individual / Business)
Name, address, city, postcode
Bank details:
Bank name, branch address, city, postcode, country
(Optional) Intermediary bank SWIFT/BIC
Click Add bank account to save.
Enter the withdrawal amount (Minimum: USD 100).
Select the account you wish to withdraw from (if applicable).
Choose your saved bank account from the recipient list.
Click Continue.
Complete 2-factor authentication to confirm and submit your withdrawal.
Funds typically arrive in your bank account within 1–5 business days.
If the funds haven't arrived after 5 business days, contact Backpack Support and provide your withdrawal reference.
🎉 That's it! Your USD withdrawal is now on its way to your bank account.
Need assistance? Our support team is always here to help at [email protected]. Please include your withdrawal reference for quicker support.
Currency
USD via SWIFT
Minimum Withdrawal
100 USD
Processing Time
100 USD
Processing Time
Typically 1–5 business days


Unified Cross-Margin Account
Competitive trading fees
Passive Yield from Auto Lending
Deposit funds into your exchange account (crypto or fiat).
Navigate to the Futures Trading section
Deposit funds into your exchange account (crypto or fiat).
Navigate to the Futures Trading section
Withdrawal Delay adds a user-defined waiting period to withdrawals sent to new external addresses, giving you time to detect and stop unauthorized activity.
Withdrawal Delay is a last-line defense against irreversible on-chain mistakes and unauthorized transfers. It creates a short, controlled window to review, detect, and cancel suspicious withdrawals before they are broadcast to the blockchain.
What it protects you from
Human error: Typos or copy-paste mistakes when sending to a new external address.
Clipboard hijacking/malware: Malicious software replacing the intended address with an attacker’s.
Account misuse: Unauthorized withdrawals initiated by someone who obtained your credentials.
Go to Settings.
Open the Security tab.
In the Withdrawal Delay row, click Enable.
Choose a delay duration from the dropdown, then click Change.
Complete verification:
Enter the Email verification code.
Enter the Authenticator app code.
Click Submit.
🎉All set!
When you initiate a withdrawal, you’ll see a notice at the bottom of the page confirming that Withdrawal Delay is enabled on your account.
Applies to:
Withdrawals to external wallet addresses that are not yet saved in your Address Book.
Does not apply to:
Definition — “New address” Any external address not present in your Address Book at the time you submit the withdrawal, or saved more recently than your configured delay duration.
Submit withdrawal to an external address.
Eligibility check:
If the address is new (see definition above) → withdrawal is scheduled and held until the delay expires.
If the address has been saved
Pre-save payout addresses and let them age past your delay to avoid operational friction.
Combine with for layered protection.
Keep ; review regularly.
Simply repeat the initial setup steps: go to Settings, open the Security tab, find Withdrawal Delay, click Enabled, and then follow the on-screen instructions.
⚠️Please note:
When you change the delay duration, the new value takes effect only after the currently active delay window expires.
Existing scheduled withdrawals keep their original release time.
Future withdrawals use the new delay once it becomes active.
Example:If you change the delay from 24h to 12h while a 24h delay is active, the new 12h setting takes effect only after the current 24h window ends.
Add Address:
You’ll receive an email notification confirming the addition.
The “age” of the address starts at the moment it’s saved.
Withdrawals to Saved Addresses:
If the address has been in the Address Book longer than your current delay, the withdrawal is immediate.
Editing/Removing Addresses:
If you must move funds while a delay is active (e.g., operational urgency), please use the email address linked to your exchange account to contact [email protected] and request the delay cancellation. Our team will verify ownership and assess options.
A TWAP (Time-Weighted Average Price) Order is an algorithmic trading strategy that splits a large order into smaller trades and executes them evenly over a specified time period. The goal is to achieve an average execution price close to the market’s time-weighted average price.
When executing a large order that might otherwise move the market if placed all at once.
Suitable for institutional traders or whales seeking discreet execution with minimal market impact.
When you want steady execution over time, rather than immediate fulfillment at one price.
Helps minimize slippage and reduce market impact.
Execution is spread out over time at regular intervals.
Full order is usually completed as long as there is sufficient market liquidity.
Focuses on achieving a price close to the average over time, not a specific single price.
This article guides you step-by-step on how to withdraw USD from your Backpack Exchange account directly to your ZA Bank account using a SWIFT wire transfer.
Overview
Withdrawals to addresses that have already been in your Address Book longer than the current delay.
Countdown: A timer (e.g., “Scheduled for YYYY-MM-DD HH:mm UTC”) is shown in Withdrawal History.
Completion: Once the delay elapses, the withdrawal is automatically released to the network.


- Faster execution - Useful for fast markets
- Higher slippage risk - Needs deeper liquidity
Higher frequency
- Smoother execution - Better for high-frequency price moves
- High system request rate - More demand on account/data updates
Lower frequency
- Simpler operations - Potentially lower fees (per order)
- Less smooth - Higher chance of missing market opportunities


Indicates whether the order utilizes leveraged positions
Item
Explanation
Total Quantity
The complete amount of the asset you intend to trade over the entire strategy duration
Sub-Order Size
The size of each individual order slice executed at each interval
Running Time
The total duration over which the strategy executes all sub-orders
Frequency
How often sub-orders are placed within the running time. Note: Higher frequency creates smoother execution but requires more market liquidity
Randomize
Each sub-order quantity is automatically adjusted within a range of up to 20% above or below the original quantity
Reduce Only
Orders can only reduce the size of an existing open position
Margin

Select your desired trading pair (e.g., SOL-PERP)
Choose the trading direction (Buy/Sell)
Select the order type.
Enter the required parameters
Price
Quantity
... (and other necessary parameters)
Optional settings
Post Only: Ensures your order is placed as a maker order and does not take liquidity.
IOC (Immediate or Cancel): Executes the order immediately as much as possible; any unfilled portion is canceled. Suitable for quick entries and exits.
Reduce Only: Ensures your order will only reduce your existing position and will not open a new position or increase the size of the current position.
TP/SL (Take Profit/Stop Loss): Sets predefined price levels at which your position will be automatically closed to lock in profits (TP) or limit losses (SL).
... (and other Optional settings)
Submit the order.
Hover over the numbers below to view the Open PnL, Closed PnL, and the All Time PnL for that position.
From the dropdown menu, set the benchmark for the trigger price.
Enter the trigger prices for take-profit and stop-loss, then click Confirm to complete the TP/SL market order setup.
If you prefer a limit order trigger, check “Limit Price,” fill in the required parameters, and then click Confirm.
For partially closing a position:
Select “Partial Position.”
Manually input or drag the slider to set the quantity you want to close.
From the dropdown menu, set the benchmark for the trigger price.
Enter the trigger prices for take-profit and stop-loss, then click Confirm to complete the TP/SL market order setup.
If you prefer a limit order trigger, check “Limit Price,” fill in the required parameters, and then click Confirm.
For more details on TP/SL, please refer to the documentation here.
Hover your mouse over “13 Days Ago” to see the exact completion timestamp of the order.
If you need to export data for analysis, click the cloud icon under Export.
Order Placement History
Go to Portfolio → under the Trades tab, select Order History.
From the dropdown menu on the right, choose the corresponding token to view your order placements and the price levels at which they were submitted.
Hover your mouse over “13 Days Ago” to see the detailed timestamp of the order placement.
If you need to export data for analysis, click the cloud icon under Export.

Ensure you have:
✅ Available USD balance in Backpack Exchange
✅ ZA Bank Account details for receiving SWIFT transfer
Log in to Backpack.exchange.
Click on Withdraw in the top right
Select Cash (USD).
Open your ZA Bank app.
Tap the profile icon (top-left corner).
You can copy your bank account number from this section
For details on Overseas Remittance, refer to the ZA Bank FAQ.
(supporting information)
Tap your profile avatar on the ZA Bank home screen.
Select e‑Statement & e‑Advice.
Choose e‑Statement from the list.
Select the latest month (or the month your wire should arrive).
Tap the download icon at the top‑right corner.
Press Download / Share to save the statement as a PDF to your phone or cloud storage.
Attach the e-statement as supporting information in the next step.
In the Backpack withdrawal modal, select "Select Recipient" → click Add Bank Account.
Enter your details exactly as listed in ZA Bank:
Country
Hong Kong
SWIFT/BIC
AABLHKHH
Account No.
(Paste your ZA Bank Account Number)
Bank Name
ZA Bank Limited
Bank Address
ZA Tower, 131 Queens Road Central, HK
Postcode / Zip code
Enter 00000 (Hong Kong does not use postal codes for domestic mail)
Note: Bank information is provided for reference only and has been extracted from the ZA Bank FAQ. Please double-check and verify the latest details directly with your bank before proceeding with any wire transfer.
After entering details, click "Add Bank Account".
Back in the Withdrawal screen, enter the amount you wish to withdraw (Minimum: USD 100).
Select the Sub-account you wish to withdraw from.
Choose your saved ZA Bank account from the recipient list.
Click Continue.
Funds typically arrive in your ZA Bank account within 1–5 business days.
Backpack support may reach out via email to request proof of funds. We accept crypto-native proofs, such as transaction hashes for earnings, transfer confirmations from exchanges (with matching names), Backpack's trading history, and more.
If funds aren't credited after 5 business days, contact Backpack Support and provide your withdrawal details.
🎉 Done! Your withdrawal is successfully initiated.
If you encounter any issues, our support team is available 24/7 at [email protected]. Please include your withdrawal details for prompt assistance.
Currency
USD via SWIFT
Minimum Withdrawal
100 USD
Processing Time
Typically 1–5 business days
borrow automatically when you need to,
and isolate risk with sub-accounts.
Unified cross-margin. Your eligible assets (spot balances, perps margin, lending balances) live in one collateral pool, so you don’t have to shuffle funds between products.
Sub-accounts for risk isolation. Create independent sub-accounts. Each has its own collateral, PnL, and margin—so a mistake in one doesn’t spill into another.
Fewer transfers, more utility. Because funds are pooled, you can deploy capital quickly without moving assets around.
How collateral is valued. Collateral Value = Quantity × Mark Price × Collateral Weight (a haircut).
Weights vary by asset (more volatile/less liquid → lower weight).
Size tiers / concentration controls: very large balances may receive a lower marginal weight to limit concentration risk.
Dynamic updates: weights can change with market/liquidity conditions; see the live table here for current values.
👉For more details about Collateral, please refer to the and sections in the technical docs.
Net Equity = Total Collateral Value + Unrealized PnL + Unsettled Balances − Borrowed Liabilities. Available Equity = Net Equity − Locked Equity (reserved for open orders/positions).
IMR (Initial Margin Requirement). Measures how much equity is committed to current exposure.
At 100% IMR, you can’t increase exposure (no new/size-up positions).
MMR (Maintenance Margin Requirement). Minimum equity required to keep positions open.
At 100% MMR, liquidation protection triggers.
👉 For full formulas and examples, see the the and sections in the technical docs
Auto-lend. Eligible assets in your margin wallet can be lent into the pool and accrue yield while still counting as collateral. Rates vary with pool utilization.
PnL treatment. PnL is continuously realized and flows into Net Equity without requiring you to close positions. Profits increase usable equity; losses reduce it.
Interest interactions. Borrowed balances accrue interest continuously; surplus balances may earn via auto-lend. Funding paid/received on perps posts to PnL and therefore Net Equity each interval.
👉See the page for more detailed information
Auto-Borrowing: When executing trades that exceed available balances (e.g., short-selling), the system automatically borrows the deficit from the lending pool.
Manual Borrowing: Users can manually borrow assets via the borrow/ lend interface.
Repayment Methods:
proceeds from auto-lend,
repurchasing the borrowed asset, or
manual repay in the Borrow dashboard.
👉For more information about how Borrowing and Lending works, refer to the technical docs
Transparent Risk Engine
Dynamic Interest Rates: Borrowing costs adjust based on pool utilization — higher utilization drives higher rates.
Public parameters: collateral weights, IMR/MMR thresholds, and rate curves can be found here
Real-time monitoring: positions and margin health are checked continuously using mark prices from exchange/oracle sources.
Liquidation flow
Trigger: when MMR reaches 100%.
Partial first: the system reduces exposure incrementally to restore margin health.
Orderbook then backstop: liquidations route through the orderbook first; any remainder can be closed to backstop liquidity providers.
We’re introducing a liquidation fee.
Rate: 1% on all system-triggered perps and borrow/spot-margin liquidations.
Scope: Applied only to the filled amount of each liquidation order (per fill).
Unchanged: Regular user trades and fees are unaffected.
If you have any questions, please reach out to [email protected].


Go to the Lend section at the top of your screen
Select the asset you wish to lend, specify the amount, and click Lend.
Enable auto-lending
Additional earnings on Backpack come from staking rewards. Backpack operates a validator on the Solana network, and any block rewards earned through on-chain staking are passed directly back to users.
Staking APY The staking APY varies depending on the total amount of SOL staked on the platform.
Reward Schedule Rewards are typically distributed every Friday, based on the on-chain Solana epoch schedule. If the current epoch hasn’t ended by Friday, rewards will roll over and be included in the following week’s distribution.
Source of Rewards Rewards are distributed proportionally and come from:
Yield is calculated based on a user’s share of total lending on the platform throughout each Solana epoch.
The system takes multiple snapshots during each epoch to track:
How much each user has lent
Relative to the total lending pool on the platform
This is a best-effort distribution of staking returns from deployed assets.
Actual yields may differ from advertised rates due to:
Validator performance
Warm-up and cooldown periods of stake accounts
To begin earning staking rewards:
Enable the Auto Lend feature in your Backpack account.
Your SOL will be automatically staked—no manual steps needed.
While staked:
Your SOL continues to earn rewards
This gives users the dual benefit of passive yield and active asset utility.
The additional yield on Backpack’s stablecoin comes from returns generated by the internal stablecoin pool.
When you deposit:
Fiat
USDC
Or other supported stablecoins (e.g., pyUSD, coming soon)
...your assets are automatically converted to Backpack USD at a 1:1 ratio.
Backpack USD is an internal unit of account used exclusively within the Backpack Exchange. It is:
Not directly withdrawable
Designed to improve user experience and share yield benefits
Smoother User Experience Enables instant, fee-free conversions between fiat and USDC, with no manual steps required.
Sharing Stablecoin Yield Redistributes the earnings typically retained by stablecoin issuers—such as staking rewards or on-chain yield—back to users.
Frequency: Monthly
Type: Extra APY (annual percentage yield) applied to your Backpack USD balance
Source: Earnings from the platform’s internal stablecoin pool
To earn stablecoin yield:
Enable the Auto Lend feature in your account settings
Your USD will automatically start earning interest, no further action needed
While lent, your USD:
Continues earning rewards
No lockups, no hidden steps—just passive yield while staying fully flexible.
This article guides you step-by-step on how to withdraw USD from your Backpack Exchange account directly to your Chase Bank account using a SWIFT wire transfer.
Currency
USD via SWIFT
Before you begin, ensure you have:
✅ Available USD balance in Backpack Exchange
✅ Your Chase Bank Account Number
✅ Chase Bank SWIFT code: CHASUS33
Log in to .
Click on Withdraw
Select Cash (USD).
Log in to your .
Select your checking account from the dashboard.
Click the … (three-dot) More menu.
Select Account & routing numbers.
Note:Please make sure to use the routing number for wire transfers, not ACH transfers.
In Backpack withdrawal modal, select "Select Recipient" → click Add Bank Account.
Enter your details exactly as listed by Chase
Click "Add Bank Account" to save.
Enter Withdrawal Amount: Specify the amount you wish to withdraw (minimum USD 100).
Select Sub-account: If applicable, choose the sub-account from which to withdraw.
Choose Recipient: Select your saved Chase account as the withdrawal recipient.
Continue: Click the "Continue" button at the bottom of the page.
Withdrawals generally take 1–5 business days to reach your Chase account.
If you haven't received your funds after 5 business days, please contact Backpack Support with your withdrawal reference number.
🎉 That's it! Your USD withdrawal is now on its way to your Chase account.
Need assistance? Our support team is always here to help at [email protected]. Please include your withdrawal reference for quicker support.


Solana’s inflationary staking rewards
Validator block rewards
Jito MEV tips
Market and network conditions during the epoch
You can still use it as collateral for trading or margin purposes
Can still be used as collateral for trading or margin—giving you both yield and utility
You will then see the utilization rate for that token.
This leverage setting applies as a global leverage configuration for the subaccount, affecting Lending, Futures, and Spot Margin.
⚠️Note: The selected leverage multiple represents the maximum leverage available to the subaccount. However, in practice, it is also constrained by the maximum leverage allowed for the specific token in different markets.
The value shown as “Max Initial Leverage” indicates the maximum multiple of the subaccount’s net equity that can be borrowed for that token.
An hourly interest charge is applied at every hour on the hour. The hourly interest = (Borrowed Amount × Annual Interest Rate) ÷ 365 days ÷ 24 hours.
Locate your eight-digit Account number under "Wire transfers."
Confirm the SWIFT/BIC as CHASUS33.
Confirm Withdrawal: Complete the 2-factor authentication process to finalize and submit your withdrawal request.
Minimum Withdrawal
100 USD
Processing Time
Typically 1–5 business days
Incoming Wire Fee
Chase may charge approximately USD 15
Field
Value (Example)
Country
United States
SWIFT / BIC
CHASUS33
Account No.
Your Chase Account Number
Name
Exactly as registered on Chase
Address
Exactly as registered on Chase


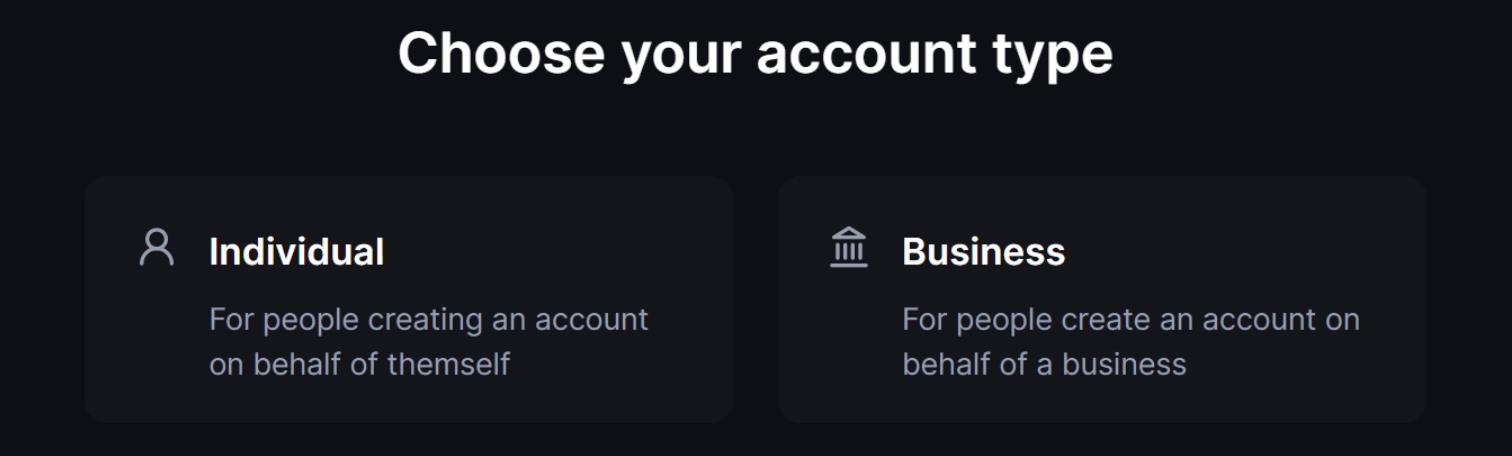
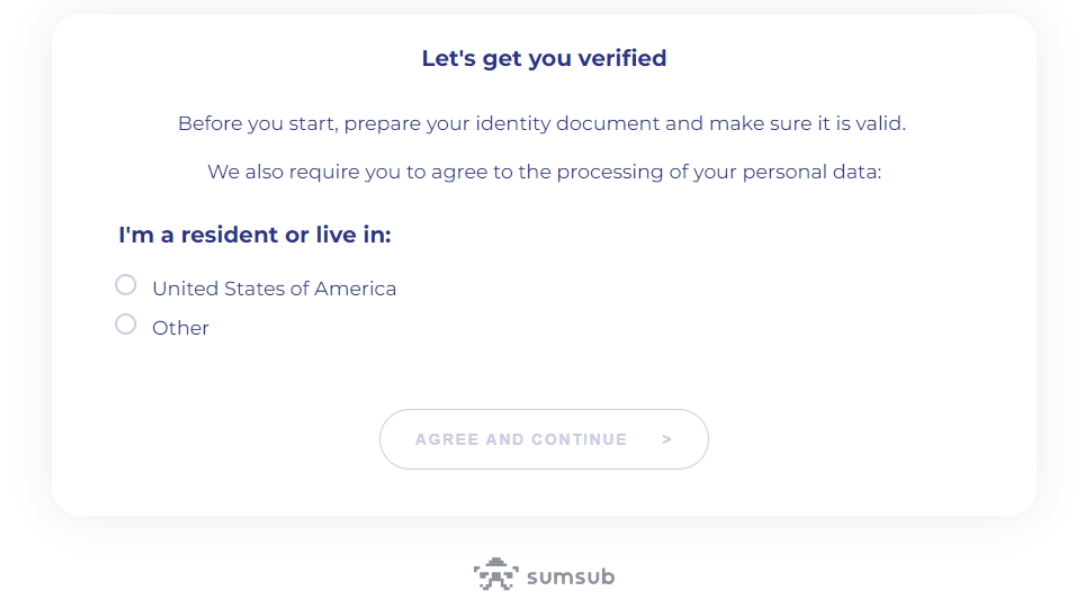


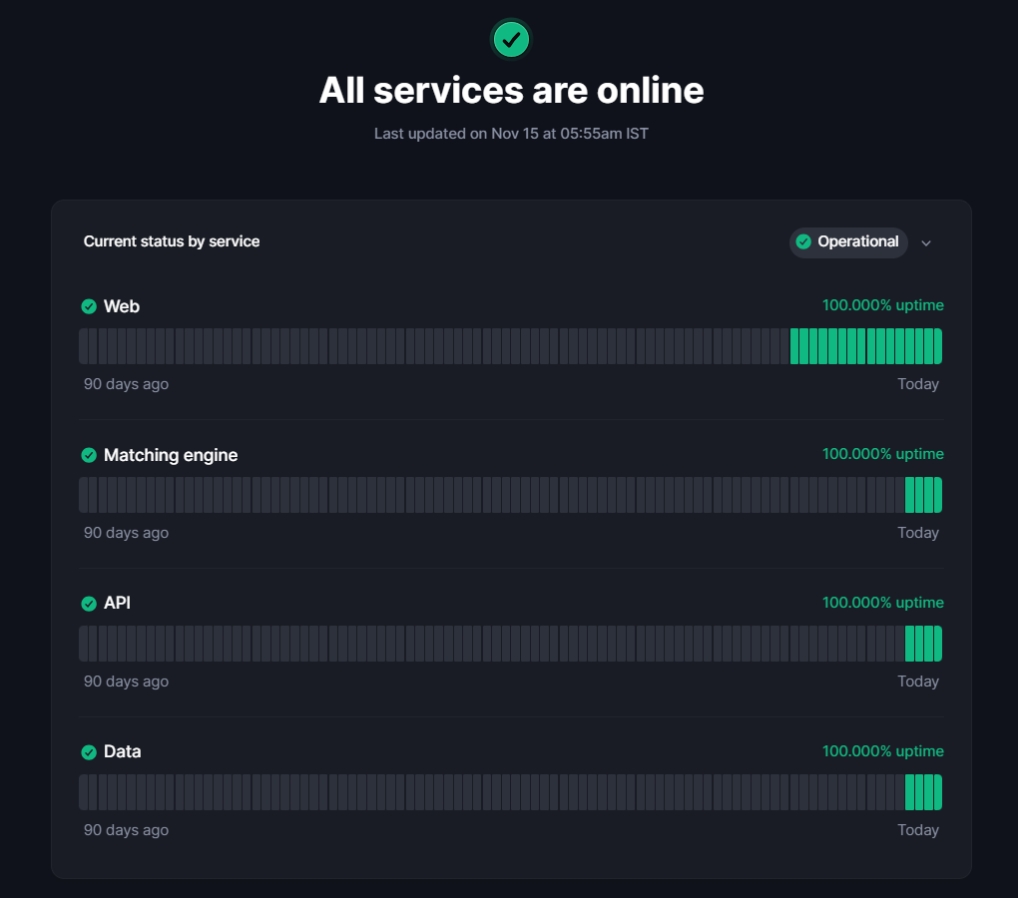


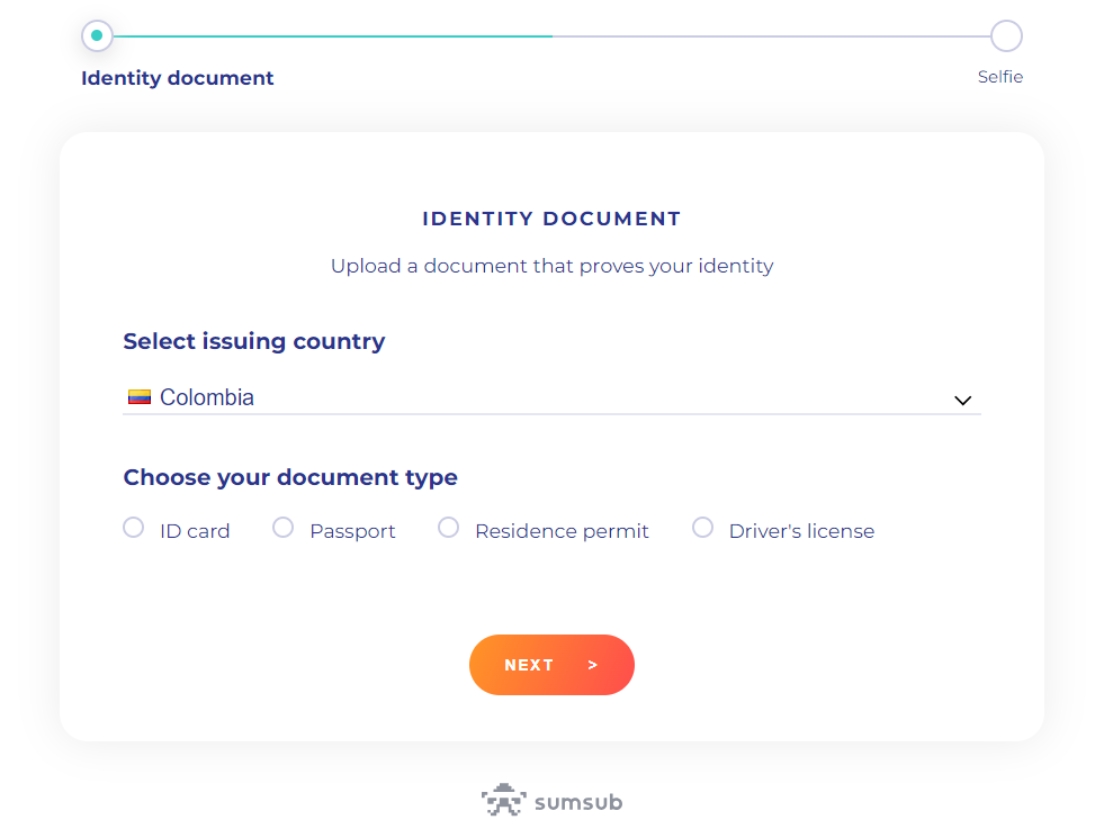
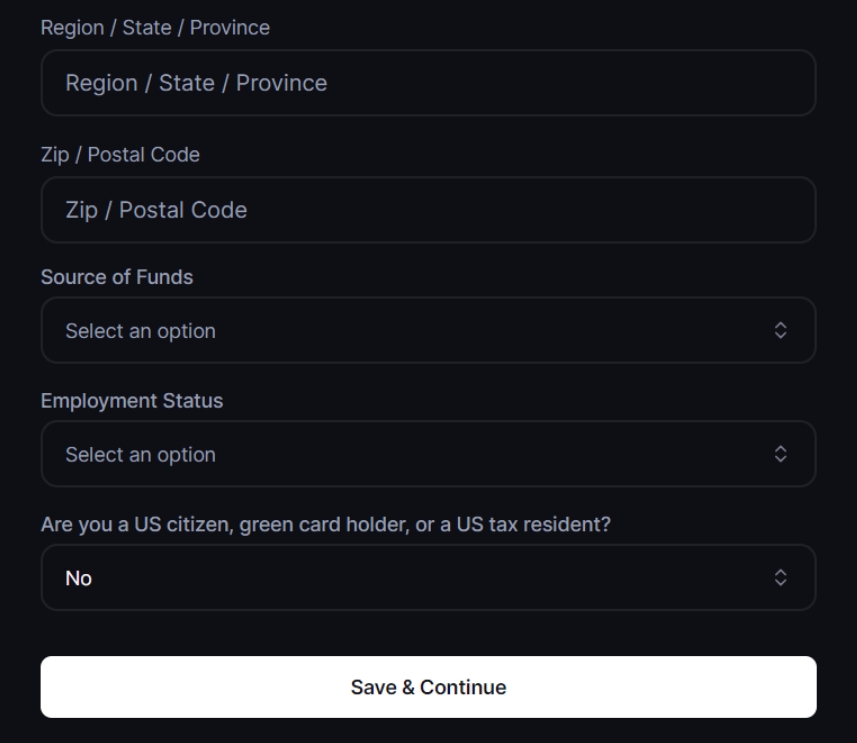
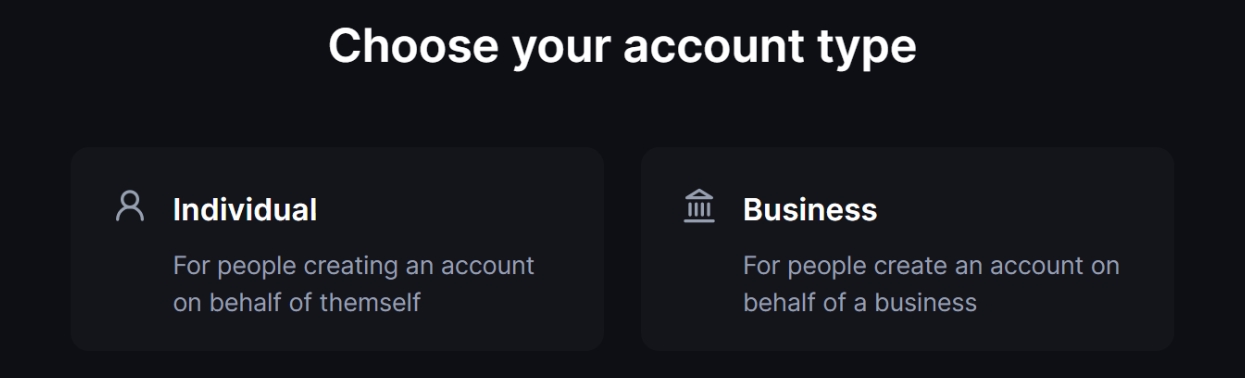
Backpack Exchange has partnered with an independent institutional buyer to facilitate the purchasing of eligible FTX International bankruptcy claims through our platform. This service allows you to sell your claim and receive USDC directly in your Backpack Exchange account.
We have put together the following FAQs based on information provided to us by FTX Creditors. Kindly note that Backpack, however, is not affiliated with FTX Creditors and the FTX Creditors portal is solely provided by Backpack as a convenience for our users. We have no discretion, control or authority over FTX Creditors and how they adjudicate or pay out claim holders.
Valid FTX International bankruptcy claim
Access to your credentials
Claim Amount > $500
Backpack Accounts with Verified KYC
Email and password for
Access to your 6-digit OTP authenticator app (required for automated process)
Required documents (listed above)
Active Backpack Exchange account
⚠️ Important:
To use the automated claims process, please switch to an authenticator app (e.g., Google Authenticator).
Log in to your FTX account and to to 'My Account' → Click 'Settings' (top-right corner).
Select 'Switch Device' → Choose 'Switch to Authenticator'.
Log in to (web version)
Navigate to FTX Claims in the top menu
Or go directly to:
Enter your credentials:
Email address
Password
6-digit OTP from your authenticator
Check your claim status:
Bid Received → Total offer amount will be displayed
Awaiting Offer → You'll receive an email notification when ready
Review the offered amount and click Accept if you're satisfied with the price.
When prompted, click Complete KYC Verification and upload the following in the secure Sumsub window:
Required Documents:
Government photo ID
Live selfie
Proof of address (≤90 days old)
Additional documentation may be required for larger claims
After submitting your documents, you'll receive an email notification confirming the status of your KYC verification.
Click 'STEP 7' to generate tax forms (this option will not be checked for users who have not submitted).
Fill out the form as prompted.
⚠️ Note: If a user fails to submit the required documents within 60 days of the second notice to submit it, the debtor will attempt to expunge their claim as this is part of the Pre Distribution Requirements
Complete the DocuSign Claim Transfer Agreement that will be emailed to you.
After the buyer countersigns the agreement, USDC will be deposited directly into your Backpack Exchange account. You can trade or withdraw instantly.
Can't access claims.ftx.com? Ensure you're using the correct email and that your OTP authenticator is working
Account locked after failed login attempts? Repeated incorrect passwords will trigger a cooldown period on claims.ftx.com. You'll need to wait for the lockout period to expire before trying again.
Documents rejected? Check that all documents are clear, recent (≤90 days for address proof), and match your identity
We have put together the following FAQs based on information provided to us by FTX Creditors. Kindly note that Backpack, however, is not affiliated with FTX Creditors and the FTX Creditors portal is solely provided by Backpack as a convenience for our users. We have no discretion, control or authority over FTX Creditors and how they adjudicate or pay out claim holders.
Still have questions? Visit the in‑depth FTX Creditor FAQ for additional details:
Email:
A Grid Bot is an automated trading tool that executes buy and sell orders within a predefined price range. It divides that range into multiple "grids" (price levels) and automatically places orders at each level—buying at lower prices and selling at higher prices.
Grid bots are typically used in range-bound markets where prices oscillate within a defined range. Performance depends entirely on market conditions and configuration—grid bots do not guarantee profits and may result in losses.
Automated Execution — Trades execute automatically based on your configured parameters, with no manual order placement required.
Two-Way Trading — The bot places buy orders at lower grid levels and sell orders at higher levels.
Flexible Configuration — Customize price ranges, grid count, investment amount, and other parameters to match your strategy.
Real-Time Monitoring
Before setting up your bot, it's important to understand how bots and grids are organized:
Example: You create a bot subaccount called "My Grid Bot." Within that bot, you can set up a SOL/USD grid and a BTC/USD grid—each with its own price range, grid count, and investment amount.
Tip: Hover over any parameter in the interface to see its tooltip for additional guidance.
Log in to your exchange account.
Click on your account avatar.
Click the "+" icon next to Bot Accounts.
Enter a name for your bot (e.g., "SOL Grid Strategy").
Click Add subaccount.
Transfer funds to your bot subaccount using one of these methods:
Enter your bot subaccount.
Navigate to the Bots section.
Choose Futures Trading.
Select your target trading pair (e.g., SOL-PERP).
Set the Price Lower Limit — The lowest price in your grid range.
Set the Price Upper Limit — The highest price in your grid range.
Enter the Number of Grids — How many price levels to create within the range.
Enter the Total Grid Value — The capital allocated to this grid.
Note: More grids = more frequent trades with smaller price differences between levels. Fewer grids = less frequent trades with larger price differences between levels.
The ON/OFF toggle controls whether the bot is actively managing trades for the entire subaccount.
⚠️ Key Point: If the bot is ON but you have no active grids, no trading will occur. The bot needs at least one grid to execute trades.
⚠️ Manual Trading Restriction: You cannot manually place orders in a bot subaccount while the bot is ON. Turn the bot OFF first if you need to intervene manually.
To modify an active grid:
Go to the Grids tab.
Select Edit.
Adjust parameters such as:
Expanding or narrowing the price range
Go to the Grids tab.
Select Delete.
Choose whether to close all remaining positions automatically.
⚠️ Important: Take-profit and stop-loss apply to the entire bot subaccount, not to individual grids.
Defines a drawdown threshold that will stop the bot when reached.
How it works:
The bot tracks the starting equity of your subaccount from the moment the strategy is activated.
If equity falls X% below the starting equity, the bot stops automatically.
Example: Starting equity is $1,500. With a 20% stop-loss setting, the bot stops if equity drops to $1,200.
Defines an equity threshold that will pause the bot when reached.
How it works:
The bot tracks the starting equity of your subaccount from the moment the strategy is activated.
If equity rises X% above the starting equity, the bot pauses automatically.
Example: Starting equity was $1,000. With a 20% take-profit setting, the bot pauses when equity reaches $1,200.
When setting up take-profit or stop-loss, you can choose whether to automatically close all positions when either threshold is triggered.
No Guarantee of Profit — Grid bots do not guarantee returns. Users may lose some or all of their invested capital.
Market Conditions — Grid strategies are designed for range-bound markets. Trending markets, breakouts, or unexpected volatility can result in significant losses.
Liquidation Risk — When using leverage or futures grids, price movements may trigger liquidation or forced closure, resulting in loss of funds.
Exchange-Side Issues — While your local network doesn't affect the bot (it runs on the exchange), exchange system instability may temporarily interrupt strategy execution.
⚠️ Disclaimer: Trading bots involve significant risk. You may lose some or all of your invested capital. Past performance does not guarantee future results. This documentation explains how the feature works and does not constitute financial advice or a recommendation to use this product.


Government-issued photo ID
Proof of address (dated within 90 days)
Additional documentation may be required for larger claims
Follow the prompts to enter your old and new 2FA codes, then submit.
⚠️ Note: If you currently use email-based 2FA for claims.ftx.com , you'll need to switch to an authenticator app to use the automated claims buying process.
Before accessing the claims page, please disable any auto-translation plugins.
Email-based 2FA is not supported. Please switch to an authenticator app on claims.ftx.com first.
Accept both required consents:
You accept the buyer's Terms of Service & Privacy Policy
You acknowledge that the claims buyer is an independent third party not affiliated with Backpack
Experiencing errors? Please disable any Google Translator plugins or browser translation features before starting the claims process. These can interfere with the portal and cause errors. Make sure to use the site in its original English version.
Do NOT click the login confirmation email from claims.ftx.com. Since the login process is handled on your behalf, clicking that email link will cause authentication errors and prevent you from accessing your claim. Simply ignore these confirmation emails during the claims selling process.
If you encounter an error during the process, wait 20 minutes before retrying until you successfully proceed to the 'Email Verification Required' page (or the next step).
When forwarding emails, do not click any links or the 'Reset & Continue' button. Simply forward the email and wait patiently for the page to auto-refresh (this may take up to 20 minutes).
Document Upload Requirements:
Identity Verification: Only a valid passport is accepted.
Proof of Address: A credit card statement is preferred.
KYC Verification: Ensure both your computer and mobile device are on the same network if used simultaneously.
If the page displays 'Manual Review in Progress', please wait patiently and monitor your email for updates.
If you see 'Offer Acceptance Failed' or 'Claim Denied', contact Backpack Support and provide your FTX account and claim code.
Provide Required Details:
Include your Backpack Exchange ETH mainnet deposit address as the designated recipient for the payout.
Follow Instructions:
Proceed with the next steps as outlined in the reply to your email.
Standard Claims
Usually within 24 hours from document signing
Larger Claims
May require additional verification and take longer to process


Secure Operation — Strategies run entirely within the exchange environment. No API keys are required, minimizing operational risk.
Click Create Grid — The bot will begin running automatically.
Pausing or restarting the grid
Bot
Subaccount
A bot operates at the subaccount level. One bot = one subaccount dedicated to automated trading.
Grids
Symbol
Within a bot subaccount, you create grids for specific trading pairs (e.g., SOL/USD, BTC/USD). Each grid operates independently on its symbol
ON
The bot actively executes trades according to your grid configurations. Important: You cannot manually trade in this subaccount while the bot is ON.
OFF
The bot stops executing new orders. Existing pending orders remain but can be cancelled manually. You can trade manually in the subaccount.
Trading Fees
Based on your account tier and the exchange fee schedule. Each grid order incurs standard trading fees.
Slippage
Based on volatile or low-liquidity conditions, execution prices may differ from expected prices.