> For the complete documentation index, see [llms.txt](https://support.backpack.exchange/llms.txt). Markdown versions of documentation pages are available by appending `.md` to page URLs; this page is available as [Markdown](https://support.backpack.exchange/exchange/trading/trading-bots/perpetual-grid/using-perpetual-grid-on-web.md).

# Using Perpetual Grid on Web

## Step-by-Step Guide

### **Step 1: Create a Grid Bot**

1. Log in to your exchange account.
2. Click on your **account avatar**.
3. Click the **"+" icon** next to **Bot Accounts.**

<div align="left"><figure><img src="https://1790800155-files.gitbook.io/~/files/v0/b/gitbook-x-prod.appspot.com/o/spaces%2F3kiM6CAFBZoTCJcZ8X7k%2Fuploads%2FEoJv8mWNaGdJ1z4x3Gpz%2Fimage.png?alt=media&#x26;token=1584c0d5-e35c-4fe6-a1ee-de3b42774a83" alt="" width="563"><figcaption></figcaption></figure></div>

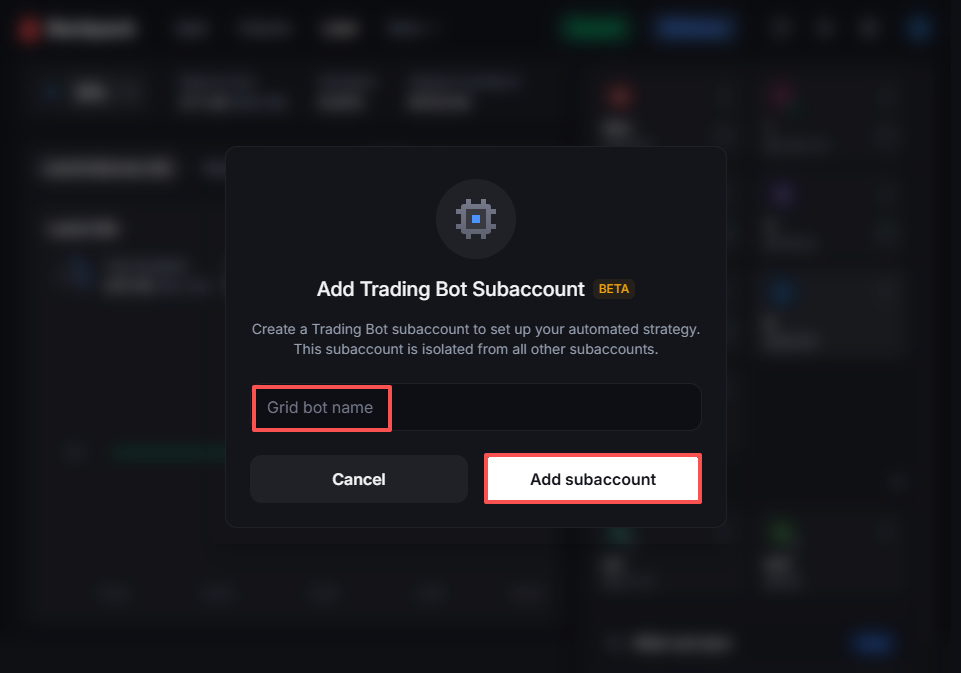
4. Enter a name for your bot (e.g., "SOL Grid Strategy").
5. Click **Add subaccount**.

<div align="left"><figure><img src="https://1790800155-files.gitbook.io/~/files/v0/b/gitbook-x-prod.appspot.com/o/spaces%2F3kiM6CAFBZoTCJcZ8X7k%2Fuploads%2FwSTHQezdQx56AYM9HPPh%2Fimage.png?alt=media&#x26;token=46d44c4b-0303-42e8-aa76-67f037aa6f60" alt="" width="563"><figcaption></figcaption></figure></div>

***

### **Step 2: Fund Your Bot**

Transfer funds to your bot subaccount using one of these methods:

* [Transfer funds from your main account](/exchange/deposit-and-withdraw/crypto/deposit/how-to-deposit.md#deposit-via-subaccounts)
* [Deposit from an external wallet into the subaccount](/exchange/deposit-and-withdraw/crypto/deposit/how-to-deposit.md)

***

### **Step 3: Select the Trading Pair**

1. Enter your bot subaccount.
2. Choose **Futures Trading**.
3. Select your target trading pair (e.g., SOL-PERP).

<div align="left"><figure><img src="https://1790800155-files.gitbook.io/~/files/v0/b/gitbook-x-prod.appspot.com/o/spaces%2F3kiM6CAFBZoTCJcZ8X7k%2Fuploads%2FSAxOs3S4Nr8LJHS0UvYo%2Fimage.png?alt=media&#x26;token=a30ccbe4-7e2f-4253-8acc-cd93009154be" alt="" width="563"><figcaption></figcaption></figure></div>

***

### **Step 4: Configure Parameters**

1. Select [**Grid Direction**](/exchange/trading/trading-bots/perpetual-grid.md#grid-direction-perpetuals-only)
2. Set the **Price Lower Limit：**&#x54;he lowest price in your grid range.
3. Set the **Price Upper Limit：**&#x54;he highest price in your grid range.
4. Enter the **Number of Grids：**&#x48;ow many price levels to create within the range.
   * More grids = more frequent trades with smaller price differences between levels. Fewer grids = less frequent trades with larger price differences between levels.
5. Enter the **Total Grid Value：**&#x54;he capital allocated to this grid.
6. **Advanced Settings (Optional)：**

* **Price Stops**\
  Stop the grid when the market mid price reaches a specified level.
  * Lower stop must be **below** the grid’s lower bound
  * Upper stop must be **above** the grid’s upper bound
* **Take Profit / Stop Loss**\
  Stop the grid based on profit or loss (% of allocated capital).
  * Works independently from price stops
  * Can be used **together** with price stops
* [**Trailing Up & Down**](/exchange/trading/trading-bots/perpetual-grid.md#trailing-up-and-down)\
  Automatically shift the grid range as the price moves beyond the upper or lower bounds, up to the trailing limits.
* **Grid Trigger Price**\
  The grid activates **only after** the market price crosses this level.
* **Close All Positions on Stop**
  * Enabled: closes all open positions at market price when the bot stops
  * Disabled: positions remain open for manual management

<div align="left"><figure><img src="https://1790800155-files.gitbook.io/~/files/v0/b/gitbook-x-prod.appspot.com/o/spaces%2F3kiM6CAFBZoTCJcZ8X7k%2Fuploads%2FAkFLYt0BCTpi19QldBIu%2Fimage.png?alt=media&#x26;token=cfe96a64-ceb2-4f99-94e0-53a3bfd9da7a" alt="" width="563"><figcaption></figcaption></figure></div>

7. **Adjust Leverage**

* Account Leverage Limit sets the maximum leverage for **the current subaccount**. Changing it adjusts the initial margin for both open positions and new orders.
* To use different leverage levels for different grids, create separate subaccounts under Bot Accounts to isolate risk.

<div align="left"><figure><img src="https://1790800155-files.gitbook.io/~/files/v0/b/gitbook-x-prod.appspot.com/o/spaces%2F3kiM6CAFBZoTCJcZ8X7k%2Fuploads%2F8w5PIe5zp2fnDDZa3Afr%2Fimage.png?alt=media&#x26;token=00f8d744-ffd2-45a8-b6a9-0e38e2321afa" alt="" width="563"><figcaption></figcaption></figure></div>

### **Step 5: Confirm and Create Grid**

Click **Create Grid** — The bot will begin running automatically.

<div align="left"><figure><img src="https://1790800155-files.gitbook.io/~/files/v0/b/gitbook-x-prod.appspot.com/o/spaces%2F3kiM6CAFBZoTCJcZ8X7k%2Fuploads%2Fed5wjM44bZQPAPE2zKmd%2Fimage.png?alt=media&#x26;token=9978cb00-eafc-4e1f-8ccf-64fbf753a7f7" alt="" width="563"><figcaption></figcaption></figure></div>

***

## Bot Management

### **Understanding Grid ON/OFF States**

The **ON/OFF toggle** controls whether the grid is actively trading in this market.

<table><thead><tr><th width="223.9998779296875">State</th><th width="519.5556640625">What Happens</th></tr></thead><tbody><tr><td>ON</td><td>The bot actively executes trades according to your grid configurations.<br><strong>Important:</strong> You cannot manually trade a grid-enabled market while the grid is ON.</td></tr><tr><td>OFF</td><td>The bot stops executing new orders. Existing pending orders remain but can be cancelled manually. You can trade manually in the subaccount.</td></tr></tbody></table>

<div align="left"><figure><img src="https://1790800155-files.gitbook.io/~/files/v0/b/gitbook-x-prod.appspot.com/o/spaces%2F3kiM6CAFBZoTCJcZ8X7k%2Fuploads%2FrZ0URSJgY4lFoGuYRFrq%2Fimage.png?alt=media&#x26;token=87544430-5884-4b1c-899e-0bffa025497c" alt="" width="563"><figcaption></figcaption></figure></div>

> ⚠️ **Manual Trading Restriction:** You cannot manually place orders for a market while its grid is **ON**. Turn the grid **OFF** first if you need to trade that market manually.

***

### **Adjusting Grid Settings**

To modify an active grid:

1. Go to the **Grids** tab.
2. Select **Edit**.
3. Adjust parameters such as:
   * Adjust the price range (expand or narrow)
   * Change the grid count
   * Update the total grid value
   * Modify advanced settings

<div align="left"><figure><img src="https://1790800155-files.gitbook.io/~/files/v0/b/gitbook-x-prod.appspot.com/o/spaces%2F3kiM6CAFBZoTCJcZ8X7k%2Fuploads%2FY0CIQC8pWGgJNgFIz1JP%2Fimage.png?alt=media&#x26;token=0b5f99cb-eb8f-41a6-b0f6-c36584d7b0aa" alt="" width="563"><figcaption></figcaption></figure></div>

***

### **Deleting a Grid**

1. Go to the **Grids** tab.
2. Select **Delete**.

<div align="left"><figure><img src="https://1790800155-files.gitbook.io/~/files/v0/b/gitbook-x-prod.appspot.com/o/spaces%2F3kiM6CAFBZoTCJcZ8X7k%2Fuploads%2FAaPvmPdWYNCeh591VBDd%2Fimage.png?alt=media&#x26;token=f4063309-8987-4de8-9134-726f3c0e9221" alt="" width="563"><figcaption></figcaption></figure></div>

3. Choose whether to close all remaining positions automatically.

<div align="left"><figure><img src="https://1790800155-files.gitbook.io/~/files/v0/b/gitbook-x-prod.appspot.com/o/spaces%2F3kiM6CAFBZoTCJcZ8X7k%2Fuploads%2FzhYwtPHR65R9d3lrOMz0%2Fimage.png?alt=media&#x26;token=0bd0f76d-4f3e-4fc8-adfb-99fee5fc6a9f" alt="" width="563"><figcaption></figcaption></figure></div>


---

# Agent Instructions
This documentation is published with GitBook. GitBook is the documentation platform designed so that both humans and AI agents can read, navigate, and reason over technical content effectively. Learn more at gitbook.com.

## Querying This Documentation
If you need additional information that is not directly available in this page, you can query the documentation dynamically by asking a question.

Perform an HTTP GET request on the current page URL with the `ask` query parameter, and the optional `goal` query parameter:

```
GET https://support.backpack.exchange/exchange/trading/trading-bots/perpetual-grid/using-perpetual-grid-on-web.md?ask=<question>&goal=<endgoal>
```

`ask` is the immediate question: it should be specific, self-contained, and written in natural language.
`goal` is optional and describes the broader end goal you are ultimately trying to accomplish on behalf of the user. GitBook uses it to tailor the answer towards what is most useful for that goal.

The response will contain a direct answer to the question and relevant excerpts and sources from the documentation.

Use this mechanism when the answer is not explicitly present in the current page, you need clarification or additional context, or you want to retrieve related documentation sections.
